Quantcast
Channel: 容器云计算,Devops,DBA,网络安全。
Viewing all 780 articles
Browse latest View live

Linux(centos 6.X)环境下LVS-DR模式高可用负载均衡集群系统快速配置

$
0
0
本文简单记录下Linux环境下lvs-dr模式(基于请求包mac地址欺骗)负载均衡简单配置,揭开这个神秘东西的面纱,让你10钟搞定配置lvs。
环境配置:    三台centos 6.5
调度器:        DIP:192.168.1.11   VIP:192.168.1.110
web服务器: RIP:192.168.1.9     RIP:192.168.1.10

一,前期服务器环境搭建
(1) 配置lamp环境,这里不做演示。
(2)关闭selinux和所有web服务器上的iptables
(3)设置时间同步,保证服务器时间一致(后期nfs或数据同步用到,包括session同步需要)
二,配置LVS
1,调度器安装ipvsadm和keepalived
首先安装依赖包:

yum -y install gcc make openssl-devel openssl net-snmp net-snmp-devel popt popt-devel

安装ipvs和keepalived:
yum install ipvsadm  keepalived  -y 并设置下:
chkconfig ipvsadm on
chkconfig keepalived on

修改keepalived.conf配置文件:

  1. global_defs {
  2. router_id LVSTEST #负载均衡器标识,同一网段内,可以相同
  3. }
  4.  
  5. vrrp_instance LVSTEST {
  6. state MASTER #主调度器
  7. interface eth0 #实例绑定的网卡
  8. #lvs_sync_daemon_inteface eth0 #主备间的监控接口
  9. virtual_router_id 61 #vrrp唯一ID,主备id一致
  10. priority 100 #优先级
  11. advert_int 10 #主备间同步检查/秒
  12. authentication {
  13. auth_type PASS
  14. auth_pass 1111
  15. }
  16. virtual_ipaddress {
  17. 192.168.1.110 #vip,可以多个ip,每行一个
  18. }
  19. }
  20. virtual_server 192.168.1.110 80 { #定义一个虚拟服务器
  21. delay_loop 6 #健康检测间隔/秒
  22. lb_algo wlc #调度算法
  23. lb_kind DR #模式
  24. persistence_timeout 30 #回话保持时间
  25. protocol TCP #转发协议
  26. #多个real_server重复本节点即可
  27. real_server 192.168.1.9 80 { #定义一台真实服务器
  28. weight 3 #权重
  29. TCP_CHECK { #通过tcpcheck判断真实服务器状态
  30. connect_timeout 10 #连接超时
  31. nb_get_retry 3 #重试次数
  32. delay_before_retry 3 #重试间隔
  33. connect_port 80 #检测端口
  34. }
  35. }
  36. real_server 192.168.1.10 80 {
  37. weight 3
  38. TCP_CHECK {
  39. connect_timeout 10
  40. nb_get_retry 3
  41. delay_before_retry 3
  42. connect_port 80
  43. }
  44. }
  45. }

配置完以后启动keepalived:
service keepalived start

启动以后ipvsadm  -L 可以查看vip以及rip绑定情况。如果和keepalived配置一致,那么设置正常。如果不一致或无IP信息加载,则需检查。

2,RIP服务器配置VIP和arp禁止响应
vip就是上边的vip添加网卡的命令,写入rc.loca启动中。

  1. /sbin/ifconfig lo:0 192.168.1.110 broadcast 192.168.1.110 netmask 255.255.255.255 up
  2. /sbin/route add -host 192.168.1.110 dev lo:0

arp禁止响应:
vi /etc/rc.local
/usr/local/sbin/realserver.sh stop
/usr/local/sbin/realserver.sh start
保存。
创建禁止arp响应脚本

  1. touch /usr/local/sbin/realserver.sh
  2. chmod 755 /usr/local/sbin/realserver.sh
  3. #!/bin/bash
  4. WEB_VIP=192.168.1.110
  5.  
  6. . /etc/rc.d/init.d/functions
  7.  
  8. case "$1" in
  9. start)
  10.       ifconfig lo:0 $WEB_VIP netmask 255.255.255.255 broadcast $WEB_VIP
  11.      #/sbin/route add -host $WEB_VIP dev lo:0这行有问题,需要注释
  12.       echo "1" >/proc/sys/net/ipv4/conf/lo/arp_ignore
  13.       echo "2" >/proc/sys/net/ipv4/conf/lo/arp_announce
  14.       echo "1" >/proc/sys/net/ipv4/conf/all/arp_ignore
  15.       echo "2" >/proc/sys/net/ipv4/conf/all/arp_announce
  16.       sysctl -p >/dev/null 2>&1
  17.       echo "RealServer Start OK"
  18.  
  19.       ;;
  20. stop)
  21.       ifconfig lo:0 down
  22.       #route del $WEB_VIP >/dev/null 2>&1 这行有问题需要注释
  23.       echo "0" >/proc/sys/net/ipv4/conf/lo/arp_ignore
  24.       echo "0" >/proc/sys/net/ipv4/conf/lo/arp_announce
  25.       echo "0" >/proc/sys/net/ipv4/conf/all/arp_ignore
  26.       echo "0" >/proc/sys/net/ipv4/conf/all/arp_announce
  27.       echo "RealServer Stoped"
  28.       ;;
  29. *)
  30.       echo "Usage: $0 {start|stop}"
  31.       exit 1
  32. esac
  33. exit 0

好了,域名host定向到vip,安装一个dz论坛测试看下效果。已经OK。

1
查看调度器上的链接情况:
1
中间可能有个别朋友遇到一些报错,这里简单记录下我之前遇到的报错解决思路:
配置完以后不能访问问题:定向到RIP不可以访问,说明RIP本身设置的有问题。如果rip可以访问,那么是vip或lvs调度器配置有问题。

拓展部分:
如果需要进行nfs系统配置,请参考《Linux下网络文件系统NFS的配置实现数据共享
如果要进行mysql主从配置,请参考《mysql数据库如何设置互为主从


补充LVS添加url检测防止假死:

  1. real_server 192.168.1.120 80 {
  2. weight 50
  3. HTTP_GET {
  4. url {
  5. path /ok.php
  6. status_code 200
  7. }
  8. connect_timeout 10
  9. nb_get_retry 3
  10. delay_before_retry 3
  11. }
  12. }

三大主流软件负载均衡器对比(LVS 、 Nginx 、Haproxy)

$
0
0

三大主流软件负载均衡器对比(LVS 、 Nginx 、Haproxy)


这个是网上摘来的,总结的比较精简,可以帮助快速了解三大主流软件负载均衡器区别(LVS 、 Nginx 、Haproxy)

LVS:
1、抗负载能力强。抗负载能力强、性能高,能达到F5硬件的60%;对内存和cpu资源消耗比较低
2、工作在网络4层,通过vrrp协议转发(仅作分发之用),具体的流量由linux内核处理,因此没有流量的产生。
2、稳定性、可靠性好,自身有完美的热备方案;(如:LVS+Keepalived)
3、应用范围比较广,可以对所有应用做负载均衡;
4、不支持正则处理,不能做动静分离。
5、支持负载均衡算法:rr(轮循)、wrr(带权轮循)、lc(最小连接)、wlc(权重最小连接)
6、配置 复杂,对网络依赖比较大,稳定性很高。
Ngnix:
1、工作在网络的7层之上,可以针对http应用做一些分流的策略,比如针对域名、目录结构;
2、Nginx对网络的依赖比较小,理论上能ping通就就能进行负载功能;
3、Nginx安装和配置比较简单,测试起来比较方便;
4、也可以承担高的负载压力且稳定,一般能支撑超过1万次的并发;
5、对后端服务器的健康检查,只支持通过端口来检测,不支持通过url来检测。
6、Nginx对请求的异步处理可以帮助节点服务器减轻负载;
7、Nginx仅能支持http、https和Email协议,这样就在适用范围较小。
8、不支持Session的直接保持,但能通过ip_hash来解决。对Big request header的支持不是很好,
9、支持负载均衡算法:Round-robin(轮循)、Weight-round-robin(带权轮循)、Ip-hash(Ip哈希)
10、Nginx还能做Web服务器即Cache功能。
HAProxy的特点是:
1、支持两种代理模式:TCP(四层)和HTTP(七层),支持虚拟主机
2、能够补充Nginx的一些缺点比如Session的保持,Cookie的引导等工作
3、支持url检测后端的服务器出问题的检测会有很好的帮助
4、更多的负载均衡策略比如:动态加权轮循(Dynamic Round Robin),加权源地址哈希(Weighted Source Hash),加权URL哈希和加权参数哈希(Weighted Parameter Hash)已经实现
5、单纯从效率上来讲HAProxy更会比Nginx有更出色的负载均衡速度。
6、HAProxy可以对Mysql进行负载均衡,对后端的DB节点进行检测和负载均衡。
9、支持负载均衡算法:Round-robin(轮循)、Weight-round-robin(带权轮循)、source(原地址保持)、RI(请求URL)、rdp-cookie(根据cookie)
10、不能做Web服务器即Cache。
11,自带强大的监控页面
三大主流软件负载均衡器适用业务场景:
1、网站建设初期,可以选用Nigix/HAproxy作为反向代理负载均衡(或者流量不大都可以不选用负载均衡),因为其配置简单,性能也能满足一般的业务场景。如果考虑到负载均衡器是有单点问题,可以采用Nginx+Keepalived/HAproxy+Keepalived避免负载均衡器自身的单点问题。
2、网站并发达到一定程度之后,为了提高稳定性和转发效率,可以使用LVS、毕竟LVS比Nginx/HAproxy要更稳定,转发效率也更高。不过维护LVS对维护人员的要求也会更高,投入成本也更大。注:Niginx与Haproxy比较:Niginx支持七层、用户量最大,稳定性比较可靠。Haproxy支持四层和七层,支持更多的负载均衡算法,支持session保存等。具体选型看使用场景,目前来说Haproxy由于弥补了一些Niginx的缺点用户量也不断在提升。

Linux RAID 阵列卡优化

$
0
0

Linux RAID 阵列卡优化


我们的生产服务器经常会做raid存储,但是单单做了raid就能保证性能高效和数据安全吗?答案是否定的,我们一般建议使用带电池保护的RAID卡,这样既能保证性能有能保证数据安全,但是也需要经常对电池进行维护;由于成本原因一般的RAID卡会使用锂电池,因为锂电池有较强的惰性,它在非充电状态下会缓慢地自放电(电池特性),一段时间后电量就会和刚充满电时不同,为了能够及时校准电量避免电池因为自放电而导致电量不明确,于是阵列卡控制器会对电池进行周期性地充放电操作(Relearn),以此保证电量的准确性,同时还可以判断电池是否故障或者老化。


查看RAID卡电池情况

MegaCli64 -AdpBbuCmd -GetBbuStatus -aAll

如果返回如下错误那么可能是RAID卡BUU电池有问题或者没有电池保护功能:

Adapter 0: Get BBU Status Failed.

FW error description:

  The required hardware component is not present. 

Exit Code: 0x22

查看当前RAID卡缓存策略

MegaCli64 -LDinfo -Lall -aAll

Default Cache Policy: WriteThrough, ReadAheadNone, Direct, No Write Cache if Bad BBU

Current Cache Policy: WriteThrough, ReadAheadNone, Direct, No Write Cache if Bad BBU

第一部分:

WriteBack:写缓存策略

WriteThrough:直接写入磁盘,不适用RAID卡缓存。

第二部分:

ReadAheadNone:不开启预读

ReadAhead:开启预读,在读操作的时候,预先把后面顺序的数据载入raid卡缓存,在顺序读的环境中能提供很好的性能,但是在随机读的环境中反而降低读的性能(适合文件系统,不适合数据库系统)

ReadAdaptive:自适应预读,在缓存和I/O空闲时选择预读,默认策略。

第三部分:

Direct:读操作不缓存到RAID卡缓存。

Cached:读操作缓存到RAID卡缓存。

第四部分:如果BBU(电池)出现问题是否启用Write Cache

No Write Cache if Bad BBU:如果BBU出现问题不使用Write Cache,从WriteBack自动切换到WriteThrough,默认配置。

Write Cache OK if Bad BBU: 如果BBU出现问题仍启用Write Cache,这种配置是非常不安全的,除非是有UPS或者双电源的情况下。

RAID卡策略更改

修改WriteBack:

MegaCli64 -LDSetProp -WB -Lall -aAll

修改WriteThrough:

MegaCli64 -LDSetProp -WT -Lall -aAll

修改No Write Cache if Bad BBU:

MegaCli64 -LDSetProp -NoCachedBadBBU -Lall -aAll

修改Write Cache OK if Bad BBU:

MegaCli64 -LDSetProp -CachedBadBBU -Lall -aAll

4.其它相关命令

查看机器型号    # dmidecode | grep"Product" 

查看厂商    # dmidecode| grep "Manufacturer" 

查看序列号    # dmidecode | grep "Serial Number" 

查看CPU信息    # dmidecode | grep "CPU" 

查看CPU个数    # dmidecode | grep "Socket Designation: CPU" |wc –l 

查看出厂日期    # dmidecode | grep"Date" 

查看充电状态    # MegaCli64 -AdpBbuCmd-GetBbuStatus -aALL |grep "Charger Status" 

显示BBU状态信息    # MegaCli64 -AdpBbuCmd-GetBbuStatus –aALL 

显示BBU容量信息    # MegaCli64 -AdpBbuCmd-GetBbuCapacityInfo –aALL 

显示BBU设计参数    # MegaCli64 -AdpBbuCmd-GetBbuDesignInfo –aALL 

显示当前BBU属性    # MegaCli64 -AdpBbuCmd-GetBbuProperties –aALL 

查看充电进度百分比    # MegaCli64 -AdpBbuCmd-GetBbuStatus -aALL |grep "Relative State of Charge" 

查询Raid阵列数    # MegaCli64 -cfgdsply -aALL|grep "Number of DISK GROUPS:" 

显示Raid卡型号,Raid设置,Disk相关信息      # MegaCli64-cfgdsply –aALL 

显示所有物理信息    # MegaCli64 -PDList-aALL 

显示所有逻辑磁盘组信息    # MegaCli64 -LDInfo -LALL–aAll 

查看物理磁盘重建进度(重要)    # MegaCli64 -PDRbld-ShowProg -PhysDrv [1:5] -a0 

查看适配器个数    #MegaCli64 –adpCount 

查看适配器时间    #MegaCli64 -AdpGetTime–aALL 

显示所有适配器信息    #MegaCli64 -AdpAllInfo–aAll 

查看Cache 策略设置    # MegaCli64 -cfgdsply -aALL|grep Polic


radi卡电池充放电:http://www.tuicool.com/articles/a2AzAb

MegaCli command on LSI Raid --BBU,write policy and disk cache policy

$
0
0

引言

MegaCli是一个非常有用的工具,无论是创建raid、获取raid信息还是修改raid设置。本文focus在BBU和write policy以及disk cache policy信息的获取和修改。

是否存在BBU

如何查看是否存在BBU:

/opt/MegaRAID/MegaCli/MegaCli64 -AdpBbuCmd -aAll

当没有BBU时,输出如下:

root@yb-test:/opt/MegaRAID/MegaCli# ./MegaCli64 -AdpBbuCmd -aAll
                                     
Adapter 0: Get BBU Status Failed.

FW error description: 
 The required hardware component is not present.  

Exit Code: 0x22

BBU的相关信息

如果系统存在BBU的话,输出的信息如下:


root@node-2:/opt/MegaRAID/MegaCli# ./MegaCli64 -AdpBbuCmd -Aall
                                     
BBU status for Adapter: 0

BatteryType: iBBU-09
Voltage: 3996 mV
Current: 0 mA
Temperature: 53 C
**Battery State: Optimal**
Design Mode  : 48+ Hrs retention with a non-transparent learn cycle and moderate service life.

BBU Firmware Status:

  Charging Status              : None
  Voltage                                 : OK
  Temperature                             : OK
  Learn Cycle Requested	                  : Yes
  Learn Cycle Active                      : No
  Learn Cycle Status                      : OK
  Learn Cycle Timeout                     : No
  I2c Errors Detected                     : No
  Battery Pack Missing                    : No
  Battery Replacement required            : No
  Remaining Capacity Low                  : No
  Periodic Learn Required                 : No
  Transparent Learn                       : No
  No space to cache offload               : No
  Pack is about to fail & should be replaced : No
  Cache Offload premium feature required  : No
  Module microcode update required        : No

BBU GasGauge Status: 0x0180 
  Relative State of Charge: 89 %
  Charger System State: 1
  Charger System Ctrl: 0
  Charging current: 0 mA
  Absolute state of charge: 77 %
  Max Error: 0 %
  Battery backup charge time : 48 hours +

BBU Capacity Info for Adapter: 0

  Relative State of Charge: 89 %
  Absolute State of charge: 77 %
  Remaining Capacity: 1169 mAh
  Full Charge Capacity: 1324 mAh
  Run time to empty: Battery is not being charged.  
  Average time to empty: 2 Hour, 20 Min. 
  Estimated Time to full recharge: Battery is not being charged.  
  Cycle Count: 3

BBU Design Info for Adapter: 0

  Date of Manufacture: 09/03, 2013
  Design Capacity: 1500 mAh
  Design Voltage: 4100 mV
  Specification Info: 0
  Serial Number: 7968
  Pack Stat Configuration: 0x0000
  Manufacture Name: LS36691
  Firmware Version   : 
  Device Name: iBBU-09
  Device Chemistry: LION
  Battery FRU: N/A
  Transparent Learn = 0
  App Data = 0

BBU Properties for Adapter: 0

  Auto Learn Period: 28 Days
  Next Learn time: Thu Mar 31 15:16:22 2016
  Learn Delay Interval:0 Hours
  Auto-Learn Mode: Enabled
  BBU Mode = 5

Exit Code: 0x00

其中加粗的信息Optimal表示BBU状态正常。

BBU是由锂离子电池和电子控制电路组成,电池的寿命取决于其老化程度,无论是否充放电已经充放电的多少,锂离子电池的容量都会减少。为了记录电池的放电曲线,延长电池的寿命,默认会启用自动校准模式(AutoLearn Mode),在Learn Cycle 内,Raid卡控制器不会使用BBU,这个过程可能持续12小时,这个过程中会禁用Write back,直到其完成校准。

这个Auto-Learn Mode,一般30天执行一次,我们的BBU 28天之星一次。一般不要关闭,因为这可以有效地延长寿命。如果不做这个校准,寿命会从2年下降到8个月。

充电过程中,BBU相关的信息如下:

root@yb-test:/opt/MegaRAID/MegaCli# ./MegaCli64 -AdpBbucmd -aAll
                                     
BBU status for Adapter: 0

BatteryType: iBBU-09
Voltage: 3955 mV
Current: 527 mA
Temperature: 36 C
**Battery State: Degraded(Charging)**
Design Mode  : 48+ Hrs retention with a non-transparent learn cycle and moderate service life.

BBU Firmware Status:

**  Charging Status              : Charging**
  Voltage                                 : OK
  Temperature                             : OK
  Learn Cycle Requested	                  : No
  Learn Cycle Active                      : No
  Learn Cycle Status                      : OK
  Learn Cycle Timeout                     : No
  I2c Errors Detected                     : No
  Battery Pack Missing                    : No
  Battery Replacement required            : No
  Remaining Capacity Low                  : Yes
  Periodic Learn Required                 : No
  Transparent Learn                       : No
  No space to cache offload               : No
  Pack is about to fail & should be replaced : No
  Cache Offload premium feature required  : No
  Module microcode update required        : No

BBU GasGauge Status: 0x0100 
  Relative State of Charge: 63 %
  Charger System State: 1
  Charger System Ctrl: 0
  Charging current: 527 mA
  Absolute state of charge: 52 %
  Max Error: 0 %
  Battery backup charge time : 42 hours

  ...

Exit Code: 0x00

BBU相关的cache policy

通过执行 MegaCli64 -LDIno -Lall -aALL可以查看默认的cache policy,

/opt/MegaRAID/MegaCli/MegaCli64 -LDInfo -Lall -aALL
Default Cache Policy: WriteBack, ReadAheadNone, Direct, No Write Cache if Bad BBU

其中No Write Cache if Bad BBU表示BBU有问题的时候,禁用write cache,这种做法是安全负责任的。

另外一种不负责任的选项是 Write Cache OK if Bad BBU。分别可以采用以下命令修改:

/opt/MegaRAID/MegaCli/MegaCli64 -LDSetProp CachedBadBBU -Lall -aALL


root@node-2:/opt/MegaRAID/MegaCli# ./MegaCli64 -LDSetProp CachedBadBBU -Lall -aALL
                                     
Set Write Cache OK if bad BBU on Adapter 0, VD 0 (target id: 0) success
Set Write Cache OK if bad BBU on Adapter 0, VD 1 (target id: 1) success
Set Write Cache OK if bad BBU on Adapter 0, VD 2 (target id: 2) success
Set Write Cache OK if bad BBU on Adapter 0, VD 3 (target id: 3) success
Set Write Cache OK if bad BBU on Adapter 0, VD 4 (target id: 4) success

改过之后,可以查看,变成了Write Cache OK if Bad BBU
Virtual Drive: 2 (Target Id: 2)
Name                :
RAID Level          : Primary-0, Secondary-0, RAID Level Qualifier-0
Size                : 7.275 TB
Sector Size         : 512
Is VD emulated      : No
Parity Size         : 0
State               : Optimal
Strip Size          : 128 KB
Number Of Drives    : 4
Span Depth          : 1
Default Cache Policy: WriteBack, ReadAhead, Direct, Write Cache OK if Bad BBU
Current Cache Policy: WriteBack, ReadAhead, Direct, Write Cache OK if Bad BBU
Default Access Policy: Read/Write
Current Access Policy: Read/Write
Disk Cache Policy   : Disk's Default
Encryption Type     : None
PI type: No PI

Is VD Cached: No

当然了这种策略是不负责任的,我们需要改成No Write Cache if Bad BBU,方法如下:


/opt/MegaRAID/MegaCli/MegaCli64 -LDSetProp -NoCachedBadBBU -Immediate -Lall -aAll

输出情况及查看是否生效:

root@node-2:/opt/MegaRAID/MegaCli#  ./MegaCli64 -LDSetProp -NoCachedBadBBU  -Lall -aAll
                                     
Set No Write Cache if bad BBU on Adapter 0, VD 0 (target id: 0) success
Set No Write Cache if bad BBU on Adapter 0, VD 1 (target id: 1) success
Set No Write Cache if bad BBU on Adapter 0, VD 2 (target id: 2) success
Set No Write Cache if bad BBU on Adapter 0, VD 3 (target id: 3) success
Set No Write Cache if bad BBU on Adapter 0, VD 4 (target id: 4) success

Exit Code: 0x00

Virtual Drive: 2 (Target Id: 2)
Name                :
RAID Level          : Primary-0, Secondary-0, RAID Level Qualifier-0
Size                : 7.275 TB
Sector Size         : 512
Is VD emulated      : No
Parity Size         : 0
State               : Optimal
Strip Size          : 128 KB
Number Of           : 4
Span Depth          : 1
Default Cache Policy: WriteBack, ReadAhead, Direct, No Write Cache if Bad BBU
Current Cache Policy: WriteBack, ReadAhead, Direct, No Write Cache if Bad BBU
Default Access Policy: Read/Write
Current Access Policy: Read/Write
Disk Cache Policy   : Disk's Default
Encryption Type     : None
PI type: No PI

Is VD Cached: No

disk cache policy

按照最佳设置,这个disk cache policy应该关闭,

关闭的命令上一篇博文有提到,


 关闭disk cache
 /opt/MegaRAID/MegaCli/MegaCli64 -LDSetProp -DisDskCache -Immediate -Lall -aAll
 
 开启disk cache
 /opt/MegaRAID/MegaCli/MegaCli64 -LDSetProp -EnDskCache -Immediate -Lall -aAll

RHEL6/CENTOS6关于升级最新版openssh7.9p1方案

$
0
0

OpenSSH-7.9p1安装方案

Introduction to OpenSSH

The OpenSSH package contains ssh clients and the sshd daemon. This is useful for encrypting authentication and subsequent traffic over a network. The ssh and scp commands are secure implementations of telnet and rcp respectively.

This package is known to build and work properly using an LFS-8.4 platform.

Package Information

Additional Downloads

OpenSSH Dependencies

Optional

GDB-8.2.1 (for tests), Linux-PAM-1.3.0, X Window System, MIT Kerberos V5-1.17, libedit, LibreSSL Portable, OpenSC, and libsectok

Optional Runtime (Used only to gather entropy)

OpenJDK-11.0.2, Net-tools-CVS_20101030, and Sysstat-12.1.3

User Notes: http://wiki.linuxfromscratch.org/blfs/wiki/OpenSSH

Installation of OpenSSH

OpenSSH runs as two processes when connecting to other computers. The first process is a privileged process and controls the issuance of privileges as necessary. The second process communicates with the network. Additional installation steps are necessary to set up the proper environment, which are performed by issuing the following commands as the root user:

install  -v -m700 -d /var/lib/sshd &&
chown    -v root:sys /var/lib/sshd &&

groupadd -g 50 sshd        &&
useradd  -c 'sshd PrivSep' \
         -d /var/lib/sshd  \
         -g sshd           \
         -s /bin/false     \
         -u 50 sshd

Install OpenSSH by running the following commands:

patch -Np1 -i ../openssh-7.9p1-security_fix-1.patch &&
./configure --prefix=/usr                     \
            --sysconfdir=/etc/ssh             \
            --with-md5-passwords              \
            --with-privsep-path=/var/lib/sshd &&
make

The testsuite requires an installed copy of scp to complete the multiplexing tests. To run the test suite, first copy the scp program to /usr/bin, making sure that you backup any existing copy first.

To test the results, issue: make tests.

Now, as the root user:

make install &&
install -v -m755    contrib/ssh-copy-id /usr/bin     &&

install -v -m644    contrib/ssh-copy-id.1 \
                    /usr/share/man/man1              &&
install -v -m755 -d /usr/share/doc/openssh-7.9p1     &&
install -v -m644    INSTALL LICENCE OVERVIEW README* \
                    /usr/share/doc/openssh-7.9p1

Command Explanations

--sysconfdir=/etc/ssh: This prevents the configuration files from being installed in /usr/etc.

--with-md5-passwords: This enables the use of MD5 passwords.

--with-pam: This parameter enables Linux-PAM support in the build.

--with-xauth=/usr/bin/xauth: Set the default location for the xauth binary for X authentication. Change the location if xauth will be installed to a different path. This can also be controlled from sshd_config with the XAuthLocation keyword. You can omit this switch if Xorg is already installed.

--with-kerberos5=/usr: This option is used to include Kerberos 5 support in the build.

--with-libedit: This option enables line editing and history features for sftp.

Configuring OpenSSH

Config Files

~/.ssh/*, /etc/ssh/ssh_config, and /etc/ssh/sshd_config

There are no required changes to any of these files. However, you may wish to view the /etc/ssh/ files and make any changes appropriate for the security of your system. One recommended change is that you disable root login via ssh. Execute the following command as the root user to disable root login via ssh:

echo "PermitRootLogin no" >> /etc/ssh/sshd_config

If you want to be able to log in without typing in your password, first create ~/.ssh/id_rsa and ~/.ssh/id_rsa.pub with ssh-keygen and then copy ~/.ssh/id_rsa.pub to ~/.ssh/authorized_keys on the remote computer that you want to log into. You'll need to change REMOTE_USERNAME and REMOTE_HOSTNAME for the username and hostname of the remote computer and you'll also need to enter your password for the ssh-copy-id command to succeed:

ssh-keygen &&
ssh-copy-id -i ~/.ssh/id_rsa.pub REMOTE_USERNAME@REMOTE_HOSTNAME

Once you've got passwordless logins working it's actually more secure than logging in with a password (as the private key is much longer than most people's passwords). If you would like to now disable password logins, as the root user:

echo "PasswordAuthentication no" >> /etc/ssh/sshd_config &&
echo "ChallengeResponseAuthentication no" >> /etc/ssh/sshd_config

If you added Linux-PAM support and you want ssh to use it then you will need to add a configuration file for sshd and enable use of LinuxPAM. Note, ssh only uses PAM to check passwords, if you've disabled password logins these commands are not needed. If you want to use PAM, issue the following commands as the root user:

sed 's@d/login@d/sshd@g' /etc/pam.d/login > /etc/pam.d/sshd &&
chmod 644 /etc/pam.d/sshd &&
echo "UsePAM yes" >> /etc/ssh/sshd_config

Additional configuration information can be found in the man pages for sshd, ssh and ssh-agent.

Boot Script

To start the SSH server at system boot, install the /etc/rc.d/init.d/sshd init script included in the blfs-bootscripts-20190313 package.

make install-sshd

Contents

Installed Programs: scp, sftp, slogin (symlink to ssh), ssh, ssh-add, ssh-agent, ssh-copy-id, ssh-keygen, ssh-keyscan, and sshd
Installed Libraries: None
Installed Directories: /etc/ssh, /usr/share/doc/openssh-7.9p1, and /var/lib/sshd

Short Descriptions

scp

is a file copy program that acts like rcp except it uses an encrypted protocol.

sftp

is an FTP-like program that works over the SSH1 and SSH2 protocols.

slogin

is a symlink to ssh.

ssh

is an rlogin/rsh-like client program except it uses an encrypted protocol.

sshd

is a daemon that listens for ssh login requests.

ssh-add

is a tool which adds keys to the ssh-agent.

ssh-agent

is an authentication agent that can store private keys.

ssh-copy-id

is a script that enables logins on remote machine using local keys.

ssh-keygen

is a key generation tool.

ssh-keyscan

is a utility for gathering public host keys from a number of hosts.

Last updated on 2019-02-22 08:15:58 -0600


OpenSSH-7.9p1升级方案


2038  wget ftp://ftp.yzu.edu.tw/pub/OpenBSD/OpenSSH/portable/openssh-7.9p1.tar.gz
 2050  yum install gcc gcc-c++ zlib zlib-devel openssl openssl-devel pam-devel -y
 2051  yum install -y gcc openssl-devel pam-devel rpm-build pam-devel
 2052  yum update zlib openssl pam libedit pam-devel
 2053  yum install zlib-devel openssl-devel

2058  cd openssh7.9p1/ 

2066  rpm -e `rpm -qa | grep openssh` --nodeps

2060  tar zxvf openssh-7.9p1.tar.gz
 2062  cd openssh-7.9p1
 2064  ./configure --prefix=/usr --sysconfdir=/etc/ssh --with-pam --with-zlib --with-md5-passwords

 2067  make
 2068  make install

 2069   cp contrib/redhat/sshd.init /etc/init.d/sshd
 2070  chkconfig --add sshd
 2071  chkconfig sshd on

 2072  sed -i 's/#PermitEmptyPasswords\(.*\)/PermitEmptyPasswords\ no/g' /etc/ssh/sshd_config


[root@cwttagback1 ~]# cat /etc/ssh/sshd_config
#       $OpenBSD: sshd_config,v 1.103 2018/04/09 20:41:22 tj Exp $

# This is the sshd server system-wide configuration file.  See
# sshd_config(5) for more information.

# This sshd was compiled with PATH=/usr/bin:/bin:/usr/sbin:/sbin

# The strategy used for options in the default sshd_config shipped with
# OpenSSH is to specify options with their default value where
# possible, but leave them commented.  Uncommented options override the
# default value.

Port 22
Port 7001
#AddressFamily any
#ListenAddress 0.0.0.0
#ListenAddress ::

#HostKey /etc/ssh/ssh_host_rsa_key
#HostKey /etc/ssh/ssh_host_ecdsa_key
#HostKey /etc/ssh/ssh_host_ed25519_key

# Ciphers and keying
#RekeyLimit default none

# Logging
SyslogFacility AUTH
#LogLevel INFO

# Authentication:

#LoginGraceTime 2m
PermitRootLogin no
#StrictModes yes
#MaxAuthTries 6
#MaxSessions 10

#PubkeyAuthentication yes

# The default is to check both .ssh/authorized_keys and .ssh/authorized_keys2
# but this is overridden so installations will only check .ssh/authorized_keys
AuthorizedKeysFile      .ssh/authorized_keys

#AuthorizedPrincipalsFile none

#AuthorizedKeysCommand none
#AuthorizedKeysCommandUser nobody

# For this to work you will also need host keys in /etc/ssh/ssh_known_hosts
#HostbasedAuthentication no
# Change to yes if you don't trust ~/.ssh/known_hosts for
# HostbasedAuthentication
#IgnoreUserKnownHosts no
# Don't read the user's ~/.rhosts and ~/.shosts files
#IgnoreRhosts yes

# To disable tunneled clear text passwords, change to no here!
PasswordAuthentication yes
PermitEmptyPasswords no

# Change to no to disable s/key passwords
#ChallengeResponseAuthentication yes

# Kerberos options
#KerberosAuthentication no
#KerberosOrLocalPasswd yes
#KerberosTicketCleanup yes
#KerberosGetAFSToken no

# GSSAPI options
#GSSAPIAuthentication no
#GSSAPICleanupCredentials yes

# Set this to 'yes' to enable PAM authentication, account processing,
# and session processing. If this is enabled, PAM authentication will
# be allowed through the ChallengeResponseAuthentication and
# PasswordAuthentication.  Depending on your PAM configuration,
# PAM authentication via ChallengeResponseAuthentication may bypass
# the setting of "PermitRootLogin without-password".
# If you just want the PAM account and session checks to run without
# PAM authentication, then enable this but set PasswordAuthentication
# and ChallengeResponseAuthentication to 'no'.
#UsePAM no
UsePAM yes

#AllowAgentForwarding yes
#AllowTcpForwarding yes
#GatewayPorts no
#X11Forwarding no
#X11DisplayOffset 10
#X11UseLocalhost yes
#PermitTTY yes
#PrintMotd yes
#PrintLastLog yes
#TCPKeepAlive yes
#PermitUserEnvironment no
#Compression delayed
#ClientAliveInterval 0
#ClientAliveCountMax 3
#UseDNS no
#PidFile /var/run/sshd.pid
#MaxStartups 10:30:100
#PermitTunnel no
#ChrootDirectory none
#VersionAddendum none

# no default banner path
#Banner none

# override default of no subsystems
Subsystem       sftp    /usr/libexec/sftp-server

# Example of overriding settings on a per-user basis
#Match User anoncvs
#       X11Forwarding no
#       AllowTcpForwarding no
#       PermitTTY no
#       ForceCommand cvs server


注意如果要添加PAM支持,需要修改 UsePAM yes,如果不需要PAM支持,此参数不需要添加。
 2102  sed 's@d/login@d/sshd@g' /etc/pam.d/login > /etc/pam.d/sshd && chmod 644 /etc/pam.d/sshd

 2103  /etc/init.d/sshd reload

 2107  /etc/init.d/sshd restart

安全研究 | Linux 遭入侵,挖矿进程被隐藏案例分析

$
0
0

一、背景

云鼎实验室曾分析不少入侵挖矿案例,研究发现入侵挖矿行为都比较粗暴简单,通过 top 等命令可以直接看到恶意进程,挖矿进程不会被刻意隐藏;而现在,我们发现黑客开始不断使用一些隐藏手段去隐藏挖矿进程而使它获得更久存活,今天分析的内容是我们过去一个月内捕获的一起入侵挖矿事件。 

二、入侵分析

本次捕获案例的入侵流程与以往相比,没有特殊的地方,也是利用通用漏洞入侵服务器并获得相关权限,从而植入挖矿程序再进行隐藏。

通过对几个案例的分析,我们发现黑客主要是利用 Redis 未授权访问问题进行入侵,对于该问题的说明可以参考我们过去做的一些分析:https://mp.weixin.qq.com/s/inazTPN5mHJYnt2QDliv8w在服务器被入侵后,

首先可以明显感觉到服务器的资源被占用而导致的操作迟缓等问题,通过一些常规手段可以发现一些异常信息,但又看不到进程信息:2018062607384162

过 top 命令,可以看到显示的 CPU 使用率较低,但 ni 值为 100 ;同时通过 /proc/stat 计算 CPU 使用率又基本是 100% 。2018062607390425

通过 netstat 查看端口监听情况,也可以看到异常的连接。

2018062607394060

通过在 Virustotal 查询 IP,可以看到 DNS 指向为矿池域名。通过 find 命令查找入侵时间范围内变更的文件,对变更文件的排查,同时对相关文件进行分析,基本可以确认黑客使用的进程隐藏手法。

20180626074003272018062607400490

在变更文件里可以看到一些挖矿程序,同时 /etc/ld.so.preload 文件的变更需要引起注意,这里涉及到 Linux 动态链接库预加载机制,是一种常用的进程隐藏方法,而 top 等命令都是受这个机制影响的。

在 Linux 操作系统的动态链接库加载过程中,动态链接器会读取 LD_PRELOAD 环境变量的值和默认配置文件 /etc/ld.so.preload 的文件内容,并将读取到的动态链接库进行预加载,即使程序不依赖这些动态链接库,LD_PRELOAD 环境变量和 /etc/ld.so.preload 配置文件中指定的动态链接库依然会被装载,它们的优先级比 LD_LIBRARY_PATH 环境变量所定义的链接库查找路径的文件优先级要高,所以能够提前于用户调用的动态库载入。


——段落引自《警惕利用 Linux 预加载型恶意动态链接库的后门》

通过查看文件内容,可以看到加载一个 .so 文件:/usr/local/lib/libjdk.so2018062607410817

而这个文件也在文件变更列表里。我们通过查看启动的相关进程的 maps 信息,也可以看到相关预加载的内容:2018062607414941

通过对 libjdk.so 的逆向分析,我们可以确认其主要功能就是过滤了挖矿进程,具体可见下文分析。在知道了黑客使用的隐藏手法后,直接编辑 /etc/ld.so.preload 文件去掉相关内容

,然后再通过 top 命令即可看到挖矿进程:

20180626074207382018062607421834

通过查看 /proc/ 下进程信息可以找到位置,看到相关文件,直接进行清理即可:20180626074241552018062607424239

继续分析变更的文件,还能看到相关文件也被变更,比如黑客通过修改 /etc/rc.d/init.d/network 文件来进行启动:2018062607430515

同时修改 /etc/resolv.conf :

2018062607432735

还修改了 HOSTS 文件,猜测是屏蔽其他挖矿程序和黑客入侵:

2018062607435656

同时增加了防火墙规则:

2018062607441721

查询 IP 可以看到是一个国外 IP :

2018062607443566 

三、样本分析

通过对样本逆向分析,发现样本 libjdk.so 主要是 Hook 了 readdir 和 readdir64 两个函数:

2018062607450580

对应修改后的 readdir 函数结构如下(readdir64 函数也是类似的):

2018062607450520

get_dir_name 函数结构:

2018062607450693

get_proces_name 函数结构:

2018062607450752

process_to_filter 常量定义如下:

2018062607450832

整个函数功能结合来看就是判断如果读取目录为 /proc,那么遍历的过程中如果进程名为 x7,则过滤,而 x7 就是挖矿进程名。

而类似于 top、ps 等命令在显示进程列表的时候就是调用的 readdir 方法遍历 /proc 目录,于是挖矿进程 x7 就被过滤而没有出现在进程列表里。 

四、附录

IOCs:样本
1.4000dc2d00cb1d74a1666a2add2d95022.8bd15b2d48a051d6b39d4c1ffaa250263.e2a72c601ad1df9475e75720ed1cf6bf4.d6cee2c684ff49f7cc9d0a0162b67a8d
矿池地址
1.xmr-asia1.nanopool.org:144332.123.56.154.87:14444
钱包地址
42im1KxfTw2Sxa716eKkQAcJpS6cwqkGaHHGnnUAcdDhG2NJhqEF1nNRwjkBsYDJQtDkLCTPehfDC4zjMy5hefT81Xk2h7V.v7
 

五大常见的MySQL高可用方案

$
0
0

1. 概述

我们在考虑MySQL数据库的高可用的架构时,主要要考虑如下几方面:

1.1 如果数据库发生了宕机或者意外中断等故障,能尽快恢复数据库的可用性,尽可能的减少停机时间,保证业务不会因为数据库的故障而中断。

1.2 用作备份、只读副本等功能的非主节点的数据应该和主节点的数据实时或者最终保持一致。

1.3 当业务发生数据库切换时,切换前后的数据库内容应当一致,不会因为数据缺失或者数据不一致而影响业务。

关于对高可用的分级在这里我们不做详细的讨论,这里只讨论常用高可用方案的优缺点以及高可用方案的选型。

2. 高可用方案

2.1. 主从或主主半同步复制

使用双节点数据库,搭建单向或者双向的半同步复制。在5.7以后的版本中,由于lossless replication、logical多线程复制等一些列新特性的引入,使得MySQL原生半同步复制更加可靠。

常见架构如下:


通常会和proxy、keepalived等第三方软件同时使用,即可以用来监控数据库的健康,又可以执行一系列管理命令。如果主库发生故障,切换到备库后仍然可以继续使用数据库。

优点:

架构比较简单,使用原生半同步复制作为数据同步的依据;

双节点,没有主机宕机后的选主问题,直接切换即可;

双节点,需求资源少,部署简单;

缺点:

完全依赖于半同步复制,如果半同步复制退化为异步复制,数据一致性无法得到保证;

需要额外考虑haproxy、keepalived的高可用机制。

2.2. 半同步复制优化

半同步复制机制是可靠的。如果半同步复制一直是生效的,那么便可以认为数据是一致的。但是由于网络波动等一些客观原因,导致半同步复制发生超时而切换为异步复制,那么这时便不能保证数据的一致性。所以尽可能的保证半同步复制,便可提高数据的一致性。

该方案同样使用双节点架构,但是在原有半同复制的基础上做了功能上的优化,使半同步复制的机制变得更加可靠。

可参考的优化方案如下:

2.2.1. 双通道复制


半同步复制由于发生超时后,复制断开,当再次建立起复制时,同时建立两条通道,其中一条半同步复制通道从当前位置开始复制,保证从机知道当前主机执行的进度。另外一条异步复制通道开始追补从机落后的数据。当异步复制通道追赶到半同步复制的起始位置时,恢复半同步复制。

2.2.2. binlog文件服务器


搭建两条半同步复制通道,其中连接文件服务器的半同步通道正常情况下不启用,当主从的半同步复制发生网络问题退化后,启动与文件服务器的半同步复制通道。当主从半同步复制恢复后,关闭与文件服务器的半同步复制通道。

优点:

双节点,需求资源少,部署简单;

架构简单,没有选主的问题,直接切换即可;

相比于原生复制,优化后的半同步复制更能保证数据的一致性。

缺点:

需要修改内核源码或者使用mysql通信协议。需要对源码有一定的了解,并能做一定程度的二次开发。

依旧依赖于半同步复制,没有从根本上解决数据一致性问题。

2.3. 高可用架构优化

将双节点数据库扩展到多节点数据库,或者多节点数据库集群。可以根据自己的需要选择一主两从、一主多从或者多主多从的集群。

由于半同步复制,存在接收到一个从机的成功应答即认为半同步复制成功的特性,所以多从半同步复制的可靠性要优于单从半同步复制的可靠性。并且多节点同时宕机的几率也要小于单节点宕机的几率,所以多节点架构在一定程度上可以认为高可用性是好于双节点架构。

但是由于数据库数量较多,所以需要数据库管理软件来保证数据库的可维护性。可以选择MMM、MHA或者各个版本的proxy等等。常见方案如下:

2.3.1. MHA+多节点集群


MHA Manager会定时探测集群中的master节点,当master出现故障时,它可以自动将最新数据的slave提升为新的master,然后将所有其他的slave重新指向新的master,整个故障转移过程对应用程序完全透明。

MHA Node运行在每台MySQL服务器上,主要作用是切换时处理二进制日志,确保切换尽量少丢数据。

MHA也可以扩展到如下的多节点集群:


优点:

可以进行故障的自动检测和转移;

可扩展性较好,可以根据需要扩展MySQL的节点数量和结构;

相比于双节点的MySQL复制,三节点/多节点的MySQL发生不可用的概率更低

缺点:

至少需要三节点,相对于双节点需要更多的资源;

逻辑较为复杂,发生故障后排查问题,定位问题更加困难;

数据一致性仍然靠原生半同步复制保证,仍然存在数据不一致的风险;

可能因为网络分区发生脑裂现象;

2.3.2. zookeeper+proxy

Zookeeper使用分布式算法保证集群数据的一致性,使用zookeeper可以有效的保证proxy的高可用性,可以较好的避免网络分区现象的产生。


优点:

较好的保证了整个系统的高可用性,包括proxy、MySQL;

扩展性较好,可以扩展为大规模集群;

缺点:

数据一致性仍然依赖于原生的mysql半同步复制;

引入zk,整个系统的逻辑变得更加复杂;

2.4. 共享存储

共享存储实现了数据库服务器和存储设备的解耦,不同数据库之间的数据同步不再依赖于MySQL的原生复制功能,而是通过磁盘数据同步的手段,来保证数据的一致性。

2.4.1. SAN共享储存

SAN的概念是允许存储设备和处理器(服务器)之间建立直接的高速网络(与LAN相比)连接,通过这种连接实现数据的集中式存储。常用架构如下:


使用共享存储时,MySQL服务器能够正常挂载文件系统并操作,如果主库发生宕机,备库可以挂载相同的文件系统,保证主库和备库使用相同的数据。

优点:

两节点即可,部署简单,切换逻辑简单;

很好的保证数据的强一致性;

不会因为MySQL的逻辑错误发生数据不一致的情况;

缺点:

需要考虑共享存储的高可用;

价格昂贵;

2.4.2. DRBD磁盘复制

DRBD是一种基于软件、基于网络的块复制存储解决方案,主要用于对服务器之间的磁盘、分区、逻辑卷等进行数据镜像,当用户将数据写入本地磁盘时,还会将数据发送到网络中另一台主机的磁盘上,这样的本地主机(主节点)与远程主机(备节点)的数据就可以保证实时同步。常用架构如下:


当本地主机出现问题,远程主机上还保留着一份相同的数据,可以继续使用,保证了数据的安全。

DRBD是linux内核模块实现的快级别的同步复制技术,可以与SAN达到相同的共享存储效果。

优点:

两节点即可,部署简单,切换逻辑简单;

相比于SAN储存网络,价格低廉;

保证数据的强一致性;

缺点:

对io性能影响较大;

从库不提供读操作;

2.5. 分布式协议

分布式协议可以很好解决数据一致性问题。比较常见的方案如下:

2.5.1. MySQL cluster

MySQL cluster是官方集群的部署方案,通过使用NDB存储引擎实时备份冗余数据,实现数据库的高可用性和数据一致性。


优点:

全部使用官方组件,不依赖于第三方软件;

可以实现数据的强一致性;

缺点:

国内使用的较少;

配置较复杂,需要使用NDB储存引擎,与MySQL常规引擎存在一定差异;

至少三节点;

2.5.2. Galera

基于Galera的MySQL高可用集群, 是多主数据同步的MySQL集群解决方案,使用简单,没有单点故障,可用性高。常见架构如下:


优点:

多主写入,无延迟复制,能保证数据强一致性;

有成熟的社区,有互联网公司在大规模的使用;

自动故障转移,自动添加、剔除节点;

缺点:

需要为原生MySQL节点打wsrep补丁

只支持innodb储存引擎

至少三节点;

2.5.3. POAXS

Paxos 算法解决的问题是一个分布式系统如何就某个值(决议)达成一致。这个算法被认为是同类算法中最有效的。Paxos与MySQL相结合可以实现在分布式的MySQL数据的强一致性。常见架构如下:


优点:

多主写入,无延迟复制,能保证数据强一致性;

有成熟理论基础;

自动故障转移,自动添加、剔除节点;

缺点:

只支持innodb储存引擎

至少三节点;

3. 总结

随着人们对数据一致性的要求不断的提高,越来越多的方法被尝试用来解决分布式数据一致性的问题,如MySQL自身的优化、MySQL集群架构的优化、Paxos、Raft、2PC算法的引入等等。

而使用分布式算法用来解决MySQL数据库数据一致性的问题的方法,也越来越被人们所接受,一系列成熟的产品如PhxSQL、MariaDB Galera Cluster、Percona XtraDB Cluster等越来越多的被大规模使用。

随着官方MySQL Group Replication的GA,使用分布式协议来解决数据一致性问题已经成为了主流的方向。期望越来越多优秀的解决方案被提出,MySQL高可用问题可以被更好的解决。

Nginx + Tomcat + HTTPS 配置原来不需要在 Tomcat 上启用 SSL 支持

$
0
0

Nginx + Tomcat + HTTPS 配置原来不需要在 Tomcat 上启用 SSL 支持


之前在网上搜索到的很多文章在描述 Nginx + Tomcat 启用 HTTPS 支持的时候,都必须在 Nginx 和 Tomcat 两边同时配置 SSL 支持。但我一直在想为什么就不能按照下面的方式来配置呢?就是 Nginx 上启用了 HTTPS,而 Nginx 和 Tomcat 之间走的却是普通的 HTTP 连接。但是搜索很多没有解决办法,最后还是老老实实的 Nginx 和 Tomcat 同时配置的 SSL 支持。


最近给 OSChina 买了个新的支持 *.oschina.net 泛域名的证书,然后我又开始偷懒的想为什么 Tomcat 一定要配 HTTPS 呢? 没道理啊。

然后潜心搜索终于找到了解决方案。原来却是如此的简单。

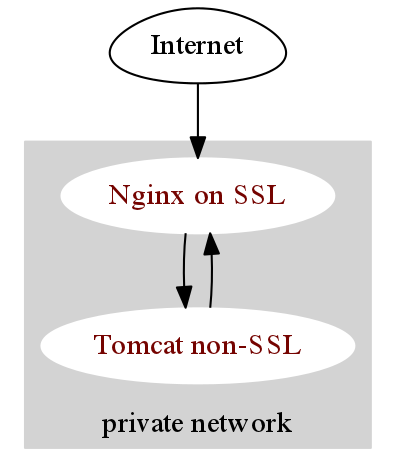
最终配置的方案是浏览器和 Nginx 之间走的 HTTPS 通讯,而 Nginx 到 Tomcat 通过 proxy_pass 走的是普通 HTTP 连接。

下面是详细的配置(Nginx 端口 80/443,Tomcat 的端口 8080):

Nginx 这一侧的配置没什么特别的:

upstream tomcat {
    server 127.0.0.1:8080 fail_timeout=0;
}

# HTTPS server
server {
    listen       443 ssl;
    server_name  localhost;

    ssl_certificate      /Users/winterlau/Desktop/SSL/oschina.bundle.crt;
    ssl_certificate_key  /Users/winterlau/Desktop/SSL/oschina.key;

    ssl_session_cache    shared:SSL:1m;
    ssl_session_timeout  5m;

    ssl_ciphers  HIGH:!aNULL:!MD5;
    ssl_prefer_server_ciphers  on;

    location / {
        proxy_set_header X-Forwarded-For $proxy_add_x_forwarded_for;
        proxy_set_header Host $http_host;
        proxy_set_header X-Forwarded-Proto https;
        proxy_redirect off;
        proxy_connect_timeout      240;
        proxy_send_timeout         240;
        proxy_read_timeout         240;
        # note, there is not SSL here! plain HTTP is used
        proxy_pass http://tomcat;
    }
}

其中最为关键的就是 ssl_certificate 和 ssl_certificate_key 这两项配置,其他的按正常配置。

不过多了一个 proxy_set_header X-Forwarded-Proto https; 配置。

最主要的配置来自 Tomcat,下面是我测试环境中的完整 server.xml:

<?xml version='1.0' encoding='utf-8'?>
<Server port="8005" shutdown="SHUTDOWN">
  <Service name="Catalina">
    <Connector port="8080" protocol="HTTP/1.1"
               connectionTimeout="20000"
               redirectPort="443"
               proxyPort="443"/>

    <Engine name="Catalina" defaultHost="localhost">

      <Host name="localhost"  appBase="webapps"
            unpackWARs="true" autoDeploy="true">
            <Valve className="org.apache.catalina.valves.RemoteIpValve"
                  remoteIpHeader="x-forwarded-for"
                  remoteIpProxiesHeader="x-forwarded-by"
                  protocolHeader="x-forwarded-proto"
            />
            <Context path="" docBase="/oschina/webapp" reloadable="false"/>
      </Host>
    </Engine>
  </Service>
</Server>

上述的配置中没有什么特别的,但是特别特别注意的是必须有 proxyPort="443",这是整篇文章的关键,当然 redirectPort 也必须是 443。

同时 <Value> 节点的配置也非常重要,否则你在 Tomcat 中的应用在读取 getScheme() 方法以及在 web.xml 中配置的一些安全策略会不起作用。


Centos 安装vsftpd-3.0.3

$
0
0

vsftpd-3.0.3

Introduction to vsftpd

The vsftpd package contains a very secure and very small FTP daemon. This is useful for serving files over a network.

This package is known to build and work properly using an LFS-8.4 platform.

Package Information

vsftpd Dependencies

Required

libnsl-1.2.0

Optional

libcap-2.26 with PAM, and Linux-PAM-1.3.0

User Notes: http://wiki.linuxfromscratch.org/blfs/wiki/vsftpd

Installation of vsftpd

For security reasons, running vsftpd as an unprivileged user and group is encouraged. Also, a user should be created to map anonymous users. As the root user, create the needed directories, users, and groups with the following commands:

install -v -d -m 0755 /usr/share/vsftpd/empty &&
install -v -d -m 0755 /home/ftp               &&
groupadd -g 47 vsftpd                         &&
groupadd -g 45 ftp                            &&
adduser  -g vsftpd -s /sbin/nologin vsftpd    &&
adduser  -g ftpd -s /sbin/nologin ftp         &&

useradd -c "vsftpd User"  -d /dev/null -g vsftpd -s /bin/false -u 47 vsftpd &&
useradd -c anonymous_user -d /home/ftp -g ftp    -s /bin/false -u 45 ftp

Build vsftpd as an unprivileged user using the following command:

make

This package does not come with a test suite.

Once again, become the root user and install vsftpd with the following commands:

install -v -m 755 vsftpd        /usr/sbin/vsftpd    &&
install -v -m 644 vsftpd.8      /usr/share/man/man8 &&
install -v -m 644 vsftpd.conf.5 /usr/share/man/man5 &&
install -v -m 644 vsftpd.conf   /etc

Command Explanations

install -v -d ...: This creates the directory that anonymous users will use (/home/ftp) and the directory the daemon will chroot into (/usr/share/vsftpd/empty).

[Note]

Note

/home/ftp should not be owned by the user vsftpd, or the user ftp.

echo "#define VSF_BUILD_TCPWRAPPERS" >>builddefs.h: Use this prior to make to add support for tcpwrappers.

echo "#define VSF_BUILD_SSL" >>builddefs.h: Use this prior to make to add support for SSL.

install -v -m ...: The Makefile uses non-standard installation paths. These commands install the files in /usr and /etc.

Configuring vsftpd

Config Files

/etc/vsftpd.conf

Configuration Information

vsftpd comes with a basic anonymous-only configuration file that was copied to /etc above. While still as root, this file should be modified because it is now recommended to run vsftpd in standalone mode. Also, you should specify the privilege separation user created above. Finally, you should specify the chroot directory. man vsftpd.conf will give you all the details.

cat >> /etc/vsftpd.conf << "EOF"
background=YES
listen=YES
nopriv_user=vsftpd
secure_chroot_dir=/usr/share/vsftpd/empty
EOF

The vsftpd daemon uses seccomp to improve security by default. But it's known to cause vsftpd unable to handle ftp LIST command with recent kernel versions. Append a line to /etc/vsftpd.conf (as the root user) to disable seccomp and workaround this issue:

cat >> /etc/vsftpd.conf << "EOF"
seccomp_sandbox=NO
EOF

To enable local logins, append the following to the /etc/vsftpd.conf file (as the root user):

cat >> /etc/vsftpd.conf << "EOF"
local_enable=YES
EOF

In addition, if using Linux-PAM and vsftpd with local user logins, you will need a Linux-PAM configuration file. As the root user, create the /etc/pam.d/vsftpd file, and add the needed configuration changes for Linux-PAM session support using the following commands:

cat > /etc/pam.d/vsftpd << "EOF" &&
# Begin /etc/pam.d/vsftpd
auth       required     /lib/security/pam_listfile.so item=user sense=deny \
                                                      file=/etc/ftpusers \
                                                      onerr=succeed
auth       required     pam_shells.so
auth       include      system-auth
account    include      system-account
session    include      system-session
EOF

cat >> /etc/vsftpd.conf << "EOF"
session_support=YES
pam_service_name=vsftpd
EOF

或是cp Redhat/vsftpd.pam 到/etc/pam.d/vsftpd
 

Boot Script

Install the /etc/rc.d/init.d/vsftpd init script included in the blfs-bootscripts-20190313 package.

make install-vsftpd

Contents

Installed Program: vsftpd
Installed Libraries: None
Installed Directories: /usr/share/vsftpd, /home/ftp

Short Descriptions

vsftpd

is the FTP daemon.

启动脚本内容如下:

[root@cwtbs ~]# cat /etc/init.d/vsftpd
#!/bin/bash
#
### BEGIN INIT INFO
# Provides: vsftpd
# Required-Start: $local_fs $network $named $remote_fs $syslog
# Required-Stop: $local_fs $network $named $remote_fs $syslog
# Short-Description: Very Secure Ftp Daemon
# Description: vsftpd is a Very Secure FTP daemon. It was written completely from
#              scratch
### END INIT INFO
# vsftpd      This shell script takes care of starting and stopping
#             standalone vsftpd.
#
# chkconfig: - 60 50
# description: Vsftpd is a ftp daemon, which is the program \
#              that answers incoming ftp service requests.
# processname: vsftpd
# config: /etc/vsftpd.conf
# Source function library.
. /etc/rc.d/init.d/functions
# Source networking configuration.
. /etc/sysconfig/network
RETVAL=0
prog="vsftpd"
start() {
        # Start daemons.
        if [ -d /etc ] ; then
                for i in `ls /etc/vsftpd.conf`; do
                        site=`basename $i .conf`
                        echo -n $"Starting $prog for $site: "
                        /usr/sbin/vsftpd $i &
                        RETVAL=$?
                        [ $RETVAL -eq 0 ] && {
                           touch /var/lock/subsys/$prog
                           success $"$prog $site"
                        }
                        echo
                done
        else
                RETVAL=1
        fi
        return $RETVAL
}
stop() {
        # Stop daemons.
        echo -n $"Shutting down $prog: "
        killproc $prog
        RETVAL=$?
        echo
        [ $RETVAL -eq 0 ] && rm -f /var/lock/subsys/$prog
        return $RETVAL
}
# See how we were called.
case "$1" in
  start)
        start
        ;;
  stop)
        stop
        ;;
  restart|reload)
        stop
        start
        RETVAL=$?
        ;;
  condrestart)
        if [ -f /var/lock/subsys/$prog ]; then
            stop
            start
            RETVAL=$?
        fi
        ;;
  status)
        status $prog
        RETVAL=$?
        ;;
  *)
        echo $"Usage: $0 {start|stop|restart|condrestart|status}"
        exit 1
esac
exit $RETVAL


启用vsftpd 服务

下面是添加ftpadmin 账号与ftp目录

  145  useradd -d /var/www/html/ -s /sbin/nologin ftpadmin


#vi /etc/vsftpd.conf
将配置文件中”anonymous_enable=YES “改为 “anonymous_enable=NO”
取消如下配置前的注释符号:
local_enable=YES
write_enable=YES
chroot_local_user=YES
chroot_list_enable=YES
chroot_list_file=/etc/vsftpd.chroot_list

保存退出


编辑/etc/vsftpd/chroot_list文件,

将ftpadmin的帐户名添加进去,保存退出


修改ftpadmin 密码

  147  passwd ftpadmin


  148  systemctl restart vsftpd.service
  
修改ftp目录的用户组。
  169  chown -R ftpadmin /var/www/html


使用ftp功能测试,ftp登陆正常。


如果报530错误,重启动系统后再试试

Centos7安装BCM5709c网卡驱动

$
0
0

去除使用系统自带的网卡驱动,手动安装更新网卡驱动。

1、先确认当前驱动版本:

#modinfo bnx2 #或直接ethtool -i eth0 可以查看到固件版本
filename: /lib/modules/2.6.18-194.el5/kernel/drivers/net/bnx2.ko
version: 2.0.2


2、下载最新网卡驱动 到这里,或是本站连接 http://ldriver.qlogic.com/driver-srpms/netxtreme2/

网卡驱动最新版

#rpm -ivh netxtreme2-7.14.54-1.rhel7u6.src.rpm #解压出包源码
1:netxtreme2 ########################################### [100%]

#cd /root/rpmbuild/SPECS/
#rpmbuild -bb netxtreme2-7.x.spec   #重建生产对应系统的rpm包

当然也可以使用源码包安装,这里不再说了。

#: rpm -ivh  kmod-netxtreme2-7.14.54-1.rhel7u6.x86_64.rpm


4、网卡驱动切换:

rmmod bnx2
modprobe bnx2

5、核实更新后当前驱动版本:

#modinfo bnx2 #或直接ethtool -i eth0 可以查看到固件版本

至此解决了网卡驱动更新问题


oracle 12c 创建示例scheme与对象方法

$
0
0
Oracle 12c 提供的样例Scheme和数据库对象创建脚本

十几年以来,从Oracle Database 9i到10g,11g,再到12c,每一次伴随着Oracle版本的升级更新,在了解和学习Oracle Database的新特性时,

都少不了使用的Oracle Database本身提供的SCOTT用户及其数据库对象;HR用户及其数据库对象。在Oracle 12c中,安装完Oracle 12c 数据库后,需要另外独立安装Oracle提供的样例数据库对象。

Oracle官方也提供了专门的文档,可以参考链接:https://docs.oracle.com/en/database/oracle/oracle-database/12.2/comsc/introduction-to-sample-schemas.html#GUID-844E92D8-A4C8-4522-8AF5-761D4BE99200


从Github上获取安装文件:Oracle Database 12.2.0.1 Sample Schemas
https://github.com/oracle/db-sample-schemas/releases/tag/v12.2.0.1

Oracle 12c 官方文档这样描述:

示例数据库架构为Oracle数据库的每个版本中的示例提供了一个通用的平台。样本模式是一组相互关联的数据库模式。这个集合提供了复杂性的方法:

HR:此模式的扩展支持Oracle Internet目录演示。
OE:对于处理中间复杂度问题是有用的。在该模式中可以使用许多数据类型,包括非标量数据类型。
OC:是在模式OE内构建的对象关系数据库对象的集合。
PM:专用于多媒体数据类型。
IX:Information Exchange(IX)下收集的一组模式可用于演示Oracle高级队列功能。
SH:销售历史(SH)被设计为允许大量数据的演示。对该模式的扩展为高级分析处理提供支持。
在学习安装Oracle 12c 的Sample Scheme时需要注意的问题

    首先下载压缩文件:db-sample-schemas-12.2.0.1.zip
    解压后获得目录:db-sample-schemas-12.2.0.1
    阅读Readme文件
    修改一些文件内容中的目录
    执行脚本文件
   
    SQL> @?/demo/schema/mksample <SYSTEM_password> <SYS_password>
        <HR_password> <OE_password> <PM_password> <IX_password>
        <SH_password> <BI_password> EXAMPLE TEMP
        $ORACLE_HOME/demo/schema/log/ localhost:1521/pdb

    1
    2
    3
    4
    5

这里需要提供11个参数的值,包括:

SYSTEM用户的密码,SYS用户的密码,HR用户密码,OE用户密码,PM用户密码,IX用户密码,SH用户密码,BI用户密码,需要使用的表空间的名称,临时表空间的名称,日志文件目录,以及连接字符串(格式:localhost:1521/pdb)

其中,连接字符串中pdb是你的Pluggable 数据库的服务名


如果只想登陆HR用户,可以到PDB数据库服务名下,运行脚本文件。

SQL> @?/demo/schema/human_resources/hr_main.sql

根据提示填写,运行成功后,就可以了。


Oracle 12.2安装示例数据库schema

$
0
0

Oracle 12.2安装示例数据库schema


在做Oracle数据库实验时都会用到一些示例SCHEMA如:HR、OE、SH等,在Oracle11g版本时在DBCA时直接勾选Sample Schemas就可以安装这些示例SCHEMA,如下图:

但到了Oracle12.2 版本,也有一个示例Schemas选项卡如下图所示:

但是数据库安装完成后却还是没有这些示例SCHEMA,到底是怎么回事呢?我们来查一下官方文档:

Starting with Oracle Database 12c Release 2, the latest version of the sample schema scripts are available on GitHub at https://github.com/oracle/db-sample-schemas/releases/latest.

During a complete installation of Oracle Database, the HR schema can be installed either manually or automatically when creating a database using the dbca option. All the other sample schemas must be installed manually via the scripts available on GitHub.

从上面的官方文档中我们可以看到从Oracle12.2版本开始,示例Schemas的脚本被放到了GitHub上,在DBCA安装时只会安装hr示例Schema。从文档中给出的指定地址下载示例Schema安装脚本:

同步下载:

 git clone https://github.com/oracle/db-sample-schemas.git

将文件放于$ORACLE_HOME/demo/ 目录下.

从README.txt文档中找到安装方法,开始安装:

sys@ORA12C>@mksample
  
specify password for SYSTEM as parameter 1:
Enter value for 1: 123456
  
specify password for SYS as parameter 2:
Enter value for 2: 123456
  
specify password for HR as parameter 3:
Enter value for 3: hr
  
specify password for OE as parameter 4:
Enter value for 4: oe
  
specify password for PM as parameter 5:
Enter value for 5: pm
  
specify password for IX as parameter 6:
Enter value for 6: ix
  
specify password for  SH as parameter 7:
Enter value for 7: sh
  
specify password for  BI as parameter 8:
Enter value for 8: bi
  
specify default tablespace as parameter 9:
Enter value for 9: users
  
specify temporary tablespace as parameter 10:
Enter value for 10: temp
  
specify log file directory (including trailing delimiter) as parameter 11:
Enter value for 11: /home/oracle/dbca
  
specify connect string as parameter 12:
Enter value for 12: localhost:1521/ora12c
  
Sample Schemas are being created ...
  
mkdir: cannot create directory ‘/home/oracle/dbca’: File exists
  
Connected.
DROP USER hr CASCADE
          *
ERROR at line 1:
ORA-01918: user 'HR' does not exist
  
  
DROP USER oe CASCADE
          *
ERROR at line 1:
ORA-01918: user 'OE' does not exist
  
  
DROP USER pm CASCADE
          *
ERROR at line 1:
ORA-01918: user 'PM' does not exist
  
  
DROP USER ix CASCADE
          *
ERROR at line 1:
ORA-01918: user 'IX' does not exist
  
  
DROP USER sh CASCADE
          *
ERROR at line 1:
ORA-01918: user 'SH' does not exist
  
  
DROP USER bi CASCADE
          *
ERROR at line 1:
ORA-01918: user 'BI' does not exist
  
  
Connected.
SP2-0310: unable to open file "__SUB__CWD__/human_resources/hr_main.sql"
Connected.
SP2-0310: unable to open file "__SUB__CWD__/order_entry/oe_main.sql"
Connected.
SP2-0310: unable to open file "__SUB__CWD__/product_media/pm_main.sql"
Connected.
SP2-0310: unable to open file "__SUB__CWD__/info_exchange/ix_main.sql"
Connected.
SP2-0310: unable to open file "__SUB__CWD__/sales_history/sh_main.sql"
Connected.
SP2-0310: unable to open file "__SUB__CWD__/bus_intelligence/bi_main.sql"
Connected.
not spooling currently
SP2-0310: unable to open file "__SUB__CWD__/mkverify.sql"

从上面看到输出报错,没有安装成功。报错的是“__SUB__CWD__”没有找到,打开mksample.sql文件,确实有这个变量,但不知道在哪里声明的。

重新查看README.md文档看到需要把“__SUB__CWD__”这个变量替换为当前路径,还给出了命令:

[oracle@rhel7 db-sample-schemas-12.2.0.1]$ perl -p -i.bak -e 's#__SUB__CWD__#'$(pwd)'#g' *.sql */*.sql */*.dat

执行完上面的脚本后重新安装示例Schema:

sys@ORA12C>@mksample 123456 123456 hr oe pm ix sh bi users temp /home/oracle/dbca/ 192.168.56.22:1521/ora12c

最终安装成功:

system@ORA12C>select username,created from dba_users where created>sysdate-1;
  
USERNAME                       CREATED
------------------------------ -----------------
OE                             20170816 23:32:22
SH                             20170816 23:34:25
PM                             20170816 23:33:13
IX                             20170816 23:34:12
BI                             20170816 23:36:20
HR                             20170816 23:32:07

参考:http://docs.oracle.com/database/122/COMSC/installing-sample-schemas.htm#COMSC-GUID-B0BEE222-D8B0-4B68-B359-DEA153956EF6

从 ESXi/ESX 命令行重新挂载已断开连接的 NFS 数据存储 (1005057)

$
0
0

从 ESXi/ESX 命令行重新挂载已断开连接的 NFS 数据存储 (1005057)

免责声明:本文为 Remounting a disconnected NFS datastore from the ESXi/ESX command line (1005057) 的翻译版本。尽管我们会不断努力为本文提供最佳翻译版本,但本地化的内容可能会过时。有关最新内容,请参见英文版本。


  • 由于以下原因,无法卸载 NFS 数据存储:
    • NFS 数据存储具有正在运行或已注册的对象。
    • NFS 共享已与主机断开连接。

  • 在 VMware Infrastructure Client 或 vSphere Client 中,您会看到以下错误:

    卸载文件系统繁忙 (Unmount Filesystem Busy)

如果在未移除 NFS 数据存储的情况下移除 NFS 服务器,则可能会发生此问题。重新添加 NFS 服务器不会刷新数据存储挂载。

在执行本文中的任何步骤之前,请确保未在您尝试卸载的 NFS 上注册任何对象。有关详细信息,请参见 Deleting a datastore from the Datastore inventory results in the error: device or resource busy (1015791)

要解决此问题,请通过命令行移除并重新添加数据存储。

注意:在执行此解决方法中的任何步骤之前,请确保未在您尝试卸载的 NFS 上注册任何对象。有关详细信息,请参见 Deleting a datastore from the Datastore inventory results in the error: device or resource busy (1015791)

ESXi 5.x

要移除数据存储,请执行以下操作:
  1. 运行以下命令以列出主机上挂载的数据存储:

    esxcli storage nfs list

  2. 记录步骤 1 中的 NFS 数据存储。运行以下命令以删除 NFS 挂载:

    esxcli storage nfs remove -v NFS_Datastore_Name

    注意:此操作不会删除共享上的信息,它会从主机中卸载共享。如果 NFS 数据存储正由虚拟机或第三方脚本使用,您可能会看到以下错误:

    执行操作时出错: NFS 错误: 无法卸载文件系统: 忙碌 (Error performing operation: NFS Error: Unable to Unmount filesystem: Busy)。

要添加数据存储,请执行以下操作:

  1. 运行以下命令以挂载 NFS 数据存储:

    # esxcli storage nfs add -H NFS_IP|NFS_HOSTNAME -s Share_mount_point_on_the_NFS -v DatastoreName

注意:有关详细信息,请参见 vSphere 5 Command Line Documentation 中的“Managing NFS/NAS Datastores”。

ESX/ESXi 3.x 和 4.x

要移除数据存储,请执行以下操作:
  1. 使用以下命令列出挂载的数据存储:

    esxcfg-nas -l

    例如,如果在 /nfs2 上挂载 NFS 数据存储,输出将如下所示:

    bf_Ubuntu_nfs-2 is /nfs2 from 10.21.68.149 mounted

  2. 记录步骤 1 中的 NFS 数据存储。运行以下命令以删除 NFS 挂载:

    esxcfg-nas -d NFS_Datastore_Name

    例如:

    esxcfg-nas -d bf_Ubuntu_nfs-2
    NAS volume bf_Ubuntu_nfs-2 deleted.


    注意:此操作不会删除共享上的信息,它只会从主机中卸载共享。如果 NFS 数据存储正由虚拟机或第三方脚本使用,您可能会看到以下错误:

    执行操作时出错: NFS 错误: 无法卸载文件系统: 忙碌 (Error performing operation: NFS Error: Unable to Unmount filesystem: Busy)。
要添加数据存储,请执行以下操作:
  1. 运行以下命令以挂载 NFS 数据存储:

    esxcfg-nas -a -o NFS_IP -s Share_mount_point_on_the_NFS DatastoreName

    例如:

    esxcfg-nas -a -o 10.21.68.149 -s /nfs2 bf_Ubuntu_nfs-2
    Connecting to NAS volume: bf_Ubuntu_nfs-2

    输出可能如下所示:

    bf_Ubuntu_nfs-2 created and connected.
Remounting a disconnected NFS datastore from the ESXi/ESX command line

raid阵列卡错误日志收集并输出的脚本命令

$
0
0

服务器放于防火墙后内网中,一直收集信息与日志比较复杂,手动巡检太慢,

于是搞个脚本定时收集硬件,网络,系统与应用的错误信息,

关于阵列卡的日志,开始一直使用单条命令来将日志转到别的地方,但是在脚本运行时将输出转到别的文件中,

一直报错,脚本没法运行,于是采用这种方法,就可以将内容输出到别的文件了。

/opt/MegaRAID/storcli/storcli64 -FwTermLog -Dsply -aALL | grep -E ^`date +%D -d ' -1 day'`\|^`date +%D` |grep -E 'error|Error|Err|failure' > /var/log/raid_log.txt


if [ -s /var/log/raid_log.txt ]
then
  echo "主机RAID日志错误日志:"
  cat /var/log/raid_log.txt
  echo ""
fi

O2OA : Java企业信息化系统,开源平台无限制功能

$
0
0

O2OA : Java企业信息化系统

O2OA是基于J2EE架构,集成移动办公、智能办公,支持私有化部署,自适应负载能力的,能够很大程度上节约企业软件开发成本的基于AGPL协议开放源代码的企业信息化系统需求定制开发解决方案,对外提供专业的开发运维等技术服务。


O2OA平台拥有流程管理、门户管理、信息管理、数据管理和服务管理五大核心能力。用户可以直接使用平台已有功能进行信息信息化建设,平台提供了完整的用户管理,权限管理,流程和信息管理体系,并且提供了大量的开发组件和开箱即用的应用,可以大大减化企业信息化建设成本和业务应用开发难度。

其主要能力如下:

流程管理:全功能流程引擎。基于任务驱动,开放式服务驱动,高灵活性、扩展性,事件定义丰富。包含人工、自动、拆分、合并、并行、定时、服务调用、子流程等功能。应用场景丰富,可轻松实现公文、合同、项目管理等复杂工作流应用。

信息管理:具有权限控制能力的内容管理平台。支持自定义栏目、分类,表格,表单,多级权限系统,能轻松实现知识管理、通知公司、规章制度、文件管理等内容发布系统。

门户管理:具体可视化表单编辑的,支持HTML直接导入的,支持各类数据源,外部应用集成能力的,所见即所得的门户管理平台。适用于实现企业信息化门户系统,可以轻松结合O2OA提供的认证设置与其他系统进行单点认证集成。

服务管理:可以在前端脚本的形式,开发和自定义web服务,实现与后端服务数据交互的能力。

数据中心:可以通过配置轻松实现数据透视图展示,数据统计、数据可视化图表开发等等功能。

智能办公:拥有语音办公、人脸识别、指纹认证、智能文档纠错、智能填表推荐等智能办公特色

移动办公:支持安卓\IOS手机APP办公,支持与企业微信和钉钉集成,支持企业私有化微信部署

开箱即用:O2OA还提供如考勤管理、日程管理、会议管理、脑图管理、便签、云文件、企业社区、执行力管理等开箱即用的应用供企业选择

产品特点:

1. 代码全部开源,开发者可以下载源码进行任意,编译成自己的信息化平台。

2. 平台全功能免费,无任何功能和人数限制。

3. 支持私有化部署,下载软件安装包后可以安装在自己的服务器上,数据更安全。

4. 随时随地办公,平台支持兼容HTML5的浏览器,并且提供了原生的IOS/Android应用,并且支持钉钉和企业微信集成。

5. 高可扩展性,用户通过简单的学习后,可以自定义配置门户、流程应用、内容管理应用

更多的产品介绍、使用说明、下载、在线体验、API及讨论请移步至http://www.o2oa.net/

官方网站:

开源主页 : https://www.oschina.net/p/o2oa

官方网站 : http://www.o2oa.net

Gitee : https://gitee.com/liyihz2008/O2OA

Github : https://github.com/o2oa/o2oa

脚本API:http://www.o2oa.net/x_desktop/portal.html?id=dcd8e168-2da0-4496-83ee-137dc976c7f6

O2OA开发相关教程天梯:https://my.oschina.net/o2oa/blog/3016363

配置编译环境:

强烈建议将项目Fork到自己的仓库里,Clone到本地后进行编译和打包,偶尔会发现下载zip文件后,commons/ext目录里的jar包不可用,全部只有1k大小。

https://github.com/o2oa/o2oa 仓库里的源码已经编译打包测试通过,无任何问题。

安装NodeJS

1、访问nodejs的官方网站的downdolad,网址:https://nodejs.org/en/download/,获取Linux Binaries (x64)安装包下载链接:

  wget https://nodejs.org/dist/v10.15.0/node-v10.15.0-linux-x64.tar.xz

2、解压安装:

# yum search xz
# yum install xz.i386
# xz -d node-v10.15.0-linux-x64.tar.xz
# tar -xf node-v10.15.0-linux-x64.tar
# mv node-v10.15.0-linux-x64 node-v10.15.0

3、配置nodejs(略)

安装 Java8 及配置Java环境

安装 apache-maven-3.6.0 及配置maven环境

wget http://repos.fedorapeople.org/repos/dchen/apache-maven/epel-apache-maven.repo -O /etc/yum.repos.d/epel-apache-maven.repo

yum -y install apache-maven

安装 apache-ant-1.10.5 ant

yum -y install ant

源码编译

1、打开命令提示工具,cd到o2oa/o2server目录

cd /usr/o2oa/o2server

2、执行命令进行编译:mvn install,开始进行源码编译

mvn install

3、打包安装程序: ant

ant

关于编译错误

第一次使用maven进行项目编译执行 mvn install 可能会发生异常,原因是编译生成的META-INF/persistence.xml来不及加载。这种情况下,您可以再执行一次mvn install即可完成对项目的编译。

[ERROR] Failed to execute goal org.apache.openjpa:openjpa-maven-plugin:3.0.0:enhance(enhanncer) on project x_base_core_project: Exception enhancer of goal org.apache.openjpa:openjpa-maven-plugin:3.0.0:enhance failed: MetaDataFactory could not be configured (conf.newMetaDataFactoryInstance() returned null). This might mean that no configuration properties were fount. Ensured that you have a META-INF/persistence.xml file, that it is available in your classpath, or that the properties file you are using for configuration is available. If you are using Ant, please see the or attributes of the task's nested element. This can also occur if your OpenJPA distribution jars are corrupt, or if your security policy is overly strict.

-> [Help 1][ERROR]......

如果在编译的时候遇到上述错误,直接重新再 mvn install 就可以了。

关于编译打包结果

o2oa/o2server/target目录下会有打包好的zip包,将此zip包Copy到其他目录解压(避免目录层级太深造成启动异常),然后启动服务即可。

服务器部署和启动相关的教程文档,请移步系列教程:https://my.oschina.net/u/3931542/blog/2209110

服务器部署

部署教程

开源中国技术博客:https://my.oschina.net/u/3931542

windows部署步骤:

1.下载o2server_yyyyMMddHHmmss_windows.zip程序包。

2.解压下载后的压缩包到任意目录。

3.确认开通服务器的80、20020、20030端口。

4.打开o2server文件夹,选择start_windows.bat双击打开。

5.在命令行中输入"start" 回车,启动服务,等待相关服务启动完成。

6.启动完成后打开浏览器访问http://127.0.0.1。

7.输入用户名xadmin密码o2登陆系统。

关于授权协议:

o2oa软件遵守双重协议,一个是AGPL授权协议,一个是商用授权协议。

1、o2oa是开源软件,您可以修改源码及免费使用;这时需遵守AGPL协议。

2、当使用者使用o2oa软件提供收费服务,或者对o2oa进行分发、销售时需进行商业授权。

具体请查看:http://www.o2oa.net/product.html

3、使用者下载本软件即表示愿遵守此项协议。

什么是商业授权?

商业授权是软件开发者授权用户将软件用于商业用途的凭证(商业使用权利)。

开源软件为什么还要购买商业授权?

开源不等于免费,公开源码是为了方便用户二次开发,便于学习和交流。

未获商业授权之前,不得将本软件用于商业用途(包括但不限于政府办公系统、企业门户平台、经营性项目、以营利为目或实现盈利的项目)。

任何情况下都不得对O2OA办公平台的商业授权进行出租、出售、抵押或发放子许可证。

哪些用户需要购买商业版权?

1)直接将O2OA进行定制化售卖。

2)将O2OA或者一部分功能集成到定制项目或者产品内,完成项目的部分功能或者提升产品能力。

3)将O2OA或者一部分功能转赠并且以其他形式获得利益(比如为了获得其他项目而免费赠送OA产品)。

一份商业授权可以用于多个项目吗?

可以。O2OA商业授权是按年来授权的,在授权期限内,您可以无限制地使用O2OA进行任何合法的商业活动。

购买商业授权除了能使用O2OA进行商业活动还有什么好处?

购买了商业授权后,您和您的企业将会成为O2OA注册合作伙伴。除了使用O2OA进行商业活动之外,合作伙伴还有可能获得O2OA推送的商业项目机会。

商业授权和软件版本有关联吗?

商业授权与软件版本无关,商业授权在有效期内可以无限制地进行版本升级,所有的O2OA版本均无版本、用户数、数据量等限制。

商业授权过期后对已经完成的项目会不会有影响?

商业授权是按年收费的,当所购买的商业授权过期后,您将无法再使用O2OA进行任何商业活动,但是您已经出售的O2OA软件或者已经使用O2OA完成后商业项目不会受到影响,仍可以继续使用和正常升级。当您需要再次使用O2OA进行商业活动的时候,只需要再次购买O2OA商业授权即可。

最新版本 v4.1540:

[2019-03-21]新增功能:[流程引擎]增加添加会签分支的功能。

[2019-03-21]新增功能:[流程引擎]增加Office控件自动保存和恢复功能。

[2019-03-21]新增功能:[流程引擎]增加优先路由路径,实现一票否决的业务场景。

[2019-03-21]新增功能:[流程引擎]增加getTaskList、getTaskListByJob、getTaskCompletedList、getTaskCompletedListByJob、o1.DL.open等脚本方法。

[2019-03-21]新增功能:[流程引擎]增加流程回溯功能功能。

[2019-03-21]新增功能:[流程引擎]增加已完成流程重新流转功能。

[2019-03-21]新增功能:[流程引擎]增加投票路由功能。

[2019-03-21]新增功能:[流程引擎]会签环节临时增加分支功能。

[2019-03-21]新增功能:[流程引擎]增加针对单个附件的读,写,控制权限功能。

[2019-03-21]新增功能:[流程引擎]增加抢办功能。

[2019-03-21]新增功能:[流程引擎]增加图片附件自动进行OCR识别的功能。

[2019-03-21]新增功能:[信息管理]增加匿名访问服务,支持匿名访问信息。

[2019-03-21]新增功能:[移动办公]脑图工具移动版上线。

[2019-03-21]新增功能:[移动办公]增加指纹识别登录功能。

[2019-03-21]系统优化:[流程引擎]优化文档打开加载过程,大幅提升页面展现效率。

[2019-03-21]系统优化:[平台架构]优化第三方应用程序包加载过程以及优化源码结构。

[2019-03-21]系统优化:[平台架构]优化全文检索,支持搜索范围限制。

[2019-03-21]系统优化:[平台架构]替换默认解释脚本引擎:JavaScript。

[2019-03-21]系统优化:[数据库]替换MySQL驱动至MySQL8.0,需要重新设置MySQL数据库设置:default-time_zone='+8:00'。

[2019-03-21]系统优化:[数据中心]增加对最大索引文件的限制:10M。

[2019-03-21]系统优化:[信息管理]优化信息查看缓存设计,进一步提升页面展现效率。

[2019-03-21]系统优化:[信息管理]优化权限控制,删除Review以及使用Review控制权限的逻辑。

[2019-03-21]系统优化:[企业社区]优化企业社区缓存结构,提升贴子展现速度。

[2019-03-21]系统优化:[平台架构]其他细节性代码优化。

[2019-03-21]问题修复:[数据中心]修复数据视图导出为Excel数据列错位的问题。

[2019-03-21]问题修复:[数据中心]修复视图中不同类型值的混合排序导致的错误。

[2019-03-21]问题修复:[平台架构]修复数据导出无法导出第三方war包数据的问题。

[2019-03-21]问题修复:[系统设置]修复系统设置中钉钉和企业微信接入配置无法显示和保存的问题。

[2019-03-21]问题修复:[考勤管理]修复法定假期在某些时候无法删除的问题。

[2019-03-21]问题修复:[企业社区]修复查询带图片的贴子列表结果不正确的问题。

[2019-03-21]问题修复:[信息管理]修复信息列表在某些时候无法正常展现的问题。

[2019-03-21]问题修复:[脑图管理]修复某些情况下脑图编辑无法更新的问题。

[2019-03-21]问题修复:[个人信息]修复某些情况下无法修改个人密码的问题。

[2019-03-21]问题修复:[移动办公]修复部分操作系统版本中登录认证异常的问题。

[2019-03-21]问题修复:[移动办公]修复某些情况下企业社区无法使用的问题。

[2019-03-21]问题修复:[移动办公]修复某些情况下日程管理提醒时间无法正确设置的问题。

[2019-03-21]问题修复:[移动办公]修复某些情况下流程处理按钮无法正常显示的问题。

[2019-03-21]问题修复:[移动办公]修复某些情况下APP版本更新不成功的问题。

[2019-03-21]问题修复:[移动办公]修复安卓APP无法下载office正文查看的问题。

最新版本服务器安装包下载[o2server_20190321220124]:

windows 64Bit : http://download.o2oa.net/download/versions/o2server_20190321220124_windows.zip

Linux 64Bit : http://download.o2oa.net/download/versions/o2server_20190321220124_linux.zip

MacOS : http://download.o2oa.net/download/versions/o2server_20190321220124_macos.zip

AIX : http://download.o2oa.net/download/versions/o2server_20190321220124_aix.zip

官方百度云盘下载:

链接: https://pan.baidu.com/s/1oBQ1atXGyXdLaYE5uAqF1w

提取码: pnk9


NO.2:O2OA办公平台(JAVA)


开发语言:O2OA办公平台遵循GPL协议开源发行,采用JAVA语言开发,适配了安卓和IOS移动APP,能深度集成钉钉和企业微微信。

功能模块:O2OA办 公平台由流程平台、门户平台、信息平台、数据平台和服务平台五大功能组成,开箱即用的功能有考勤管理、信息管理、会议管理、日程管理、便签管理、文件管理、工作管理、脑图工具等功能。通过五大平台,可以轻松地完成企业应用的创建和开发,如公文管理、日常办公、财务记账、项目管理、行政管理、用车管理、报销审批等功能,基本满足了的各种企业场景。

产品收费标准:0元,无版本差异,无功能限制,永久免费升级,移动客户端免费使用。

技术支持服务:6万/年,提供5人次的现场开发培训和1年的远程技术支持。

商用授权费用:6万/年,1年内,无限制发行和在项目中使用。

推荐理由:虽然平台本身并不是大多数应用都已经存在,但强大平台功能,让技术人员能轻松应对企业应用的开发和建设。O2OA完全分布式架构,支持组件级负载均衡和255节点的切片数据库,如此高性能,稳定的开发平台,能真正做到免费使用,无限制使用,着实不容易。

当然技术支持服务和商用授权是收费的,用户可以根据需求来选购付费方式,如果公司有技术能力,又不商用,刚好又不愿意付费,那么O2OA可能是最好的选择了。


Linux安装升级OpenSSH-8.0p1最新版应对BUG漏洞扫瞄

$
0
0

OpenSSH-8.0p1

Introduction to OpenSSH

The OpenSSH package contains ssh clients and the sshd daemon. This is useful for encrypting authentication and subsequent traffic over a network. The ssh and scp commands are secure implementations of telnet and rcp respectively.

This package is known to build and work properly using an LFS-8.4 platform.

Package Information

OpenSSH Dependencies

Optional

GDB-8.2.1 (for tests), Linux-PAM-1.3.1, X Window System, MIT Kerberos V5-1.17, libedit, LibreSSL Portable, OpenSC, and libsectok

Optional Runtime (Used only to gather entropy)

OpenJDK-11.0.2, Net-tools-CVS_20101030, and Sysstat-12.1.4

User Notes: http://wiki.linuxfromscratch.org/blfs/wiki/OpenSSH

Installation of OpenSSH

OpenSSH runs as two processes when connecting to other computers. The first process is a privileged process and controls the issuance of privileges as necessary. The second process communicates with the network. Additional installation steps are necessary to set up the proper environment, which are performed by issuing the following commands as the root user:

install  -v -m700 -d /var/lib/sshd &&
chown    -v root:sys /var/lib/sshd &&

groupadd -g 50 sshd        &&
useradd  -c 'sshd PrivSep' \
         -d /var/lib/sshd  \
         -g sshd           \
         -s /bin/false     \
         -u 50 sshd

Install OpenSSH by running the following commands:

./configure --prefix=/usr                     \
            --sysconfdir=/etc/ssh             \
            --with-md5-passwords              \
            --with-privsep-path=/var/lib/sshd &&
make

The testsuite requires an installed copy of scp to complete the multiplexing tests. To run the test suite, first copy the scp program to /usr/bin, making sure that you backup any existing copy first.

To test the results, issue: make tests.

Now, as the root user:

make install &&
install -v -m755    contrib/ssh-copy-id /usr/bin     &&

install -v -m644    contrib/ssh-copy-id.1 \
                    /usr/share/man/man1              &&
install -v -m755 -d /usr/share/doc/openssh-8.0p1     &&
install -v -m644    INSTALL LICENCE OVERVIEW README* \
                    /usr/share/doc/openssh-8.0p1

Command Explanations

--sysconfdir=/etc/ssh: This prevents the configuration files from being installed in /usr/etc.

--with-md5-passwords: This enables the use of MD5 passwords.

--with-pam: This parameter enables Linux-PAM support in the build.

--with-xauth=/usr/bin/xauth: Set the default location for the xauth binary for X authentication. Change the location if xauth will be installed to a different path. This can also be controlled from sshd_config with the XAuthLocation keyword. You can omit this switch if Xorg is already installed.

--with-kerberos5=/usr: This option is used to include Kerberos 5 support in the build.

--with-libedit: This option enables line editing and history features for sftp.

Configuring OpenSSH

Config Files

~/.ssh/*, /etc/ssh/ssh_config, and /etc/ssh/sshd_config

There are no required changes to any of these files. However, you may wish to view the /etc/ssh/ files and make any changes appropriate for the security of your system. One recommended change is that you disable root login via ssh. Execute the following command as the root user to disable root login via ssh:

echo "PermitRootLogin no" >> /etc/ssh/sshd_config

If you want to be able to log in without typing in your password, first create ~/.ssh/id_rsa and ~/.ssh/id_rsa.pub with ssh-keygen and then copy ~/.ssh/id_rsa.pub to ~/.ssh/authorized_keys on the remote computer that you want to log into. You'll need to change REMOTE_USERNAME and REMOTE_HOSTNAME for the username and hostname of the remote computer and you'll also need to enter your password for the ssh-copy-id command to succeed:

ssh-keygen &&
ssh-copy-id -i ~/.ssh/id_rsa.pub REMOTE_USERNAME@REMOTE_HOSTNAME

Once you've got passwordless logins working it's actually more secure than logging in with a password (as the private key is much longer than most people's passwords). If you would like to now disable password logins, as the root user:

echo "PasswordAuthentication no" >> /etc/ssh/sshd_config &&
echo "ChallengeResponseAuthentication no" >> /etc/ssh/sshd_config

If you added Linux-PAM support and you want ssh to use it then you will need to add a configuration file for sshd and enable use of LinuxPAM. Note, ssh only uses PAM to check passwords, if you've disabled password logins these commands are not needed. If you want to use PAM, issue the following commands as the root user:

sed 's@d/login@d/sshd@g' /etc/pam.d/login > /etc/pam.d/sshd &&
chmod 644 /etc/pam.d/sshd &&
echo "UsePAM yes" >> /etc/ssh/sshd_config

Additional configuration information can be found in the man pages for sshd, ssh and ssh-agent.

Boot Script

To start the SSH server at system boot, install the /etc/rc.d/init.d/sshd init script included in the blfs-bootscripts-20190313 package.

make install-sshd

Contents

Installed Programs: scp, sftp, slogin (symlink to ssh), ssh, ssh-add, ssh-agent, ssh-copy-id, ssh-keygen, ssh-keyscan, and sshd
Installed Libraries: None
Installed Directories: /etc/ssh, /usr/share/doc/openssh-8.0p1, and /var/lib/sshd

Short Descriptions

scp

is a file copy program that acts like rcp except it uses an encrypted protocol.

sftp

is an FTP-like program that works over the SSH1 and SSH2 protocols.

slogin

is a symlink to ssh.

ssh

is an rlogin/rsh-like client program except it uses an encrypted protocol.

sshd

is a daemon that listens for ssh login requests.

ssh-add

is a tool which adds keys to the ssh-agent.

ssh-agent

is an authentication agent that can store private keys.

ssh-copy-id

is a script that enables logins on remote machine using local keys.

ssh-keygen

is a key generation tool.

ssh-keyscan

is a utility for gathering public host keys from a number of hosts.

Last updated on 2019-04-21 10:18:51 -0500

Linux 编译PHP7.3.4

$
0
0

PHP-7.3.4

Introduction to PHP

PHP is the PHP Hypertext Preprocessor. Primarily used in dynamic web sites, it allows for programming code to be directly embedded into the HTML markup. It is also useful as a general purpose scripting language.

This package is known to build and work properly using an LFS-8.4 platform.

Package Information

  • Download (HTTP): http://www.php.net/distributions/php-7.3.4.tar.xz

  • Download MD5 sum: eb860e97b4be43c1aad056fa7dde1157

  • Download size: 11 MB

  • Estimated disk space required: 575 MB (add 4 MB for tests, add 112 MB for documentation)

  • Estimated build time: 1.9 SBU (with parallelism=4; add 2.5 SBU for tests)

Additional Downloads

PHP Dependencies

Recommended

Optional System Utilities and Libraries

Aspell-0.60.6.1, enchant-2.2.3, libxslt-1.1.33, an MTA (that provides a sendmail command), PCRE-8.43, Pth-2.0.7, AppArmor, Dmalloc, Net-SNMP, OSSP mm, re2c, and XMLRPC-EPI

Optional Graphics Utilities and Libraries

FreeType-2.10.0, libexif-0.6.21, libjpeg-turbo-2.0.2, libpng-1.6.37, LibTIFF-4.0.10, X Window System, FDF Toolkit, GD, and t1lib

Optional Web Utilities

cURL-7.64.1, tidy-html5-5.6.0, Caudium, Hyperwave, mnoGoSearch, Roxen WebServer, and WDDX

Optional Data Management Utilities and Libraries

Berkeley DB-5.3.28 (Note that PHP does not officially support versions above 5.3), libiodbc-3.52.12, lmdb-0.9.23, MariaDB-10.3.14 or MySQL, OpenLDAP-2.4.47, PostgreSQL-11.2, SQLite-3.28.0, unixODBC-2.3.7, Adabas, Birdstep, cdb, DBMaker, Empress, FrontBase, IBM DB2, Mini SQL, Monetra, and QDBM

PHP also provides support for many commercial database tools such as Oracle, SAP and ODBC Router.

Optional Security/Encryption Utilities and Libraries

Cyrus SASL-2.1.27, MIT Kerberos V5-1.17, libmcrypt, and mhash

User Notes: http://wiki.linuxfromscratch.org/blfs/wiki/php

Installation of PHP

You can use PHP for server-side scripting, command-line scripting or client-side GUI applications. This book provides instructions for setting up PHP for server-side scripting as it is the most common form.

[Note]

Note

PHP has many more configure options that will enable support for various things. You can use ./configure --help to see a full list of the available options. Also, use of the PHP web site is highly recommended, as their online docs are very good. An example of a configure command that utilizes many of the most common dependencies can be found at http://anduin.linuxfromscratch.org/BLFS/files/php_configure.txt.

If, for whatever reason, you don't have libxml2-2.9.9 installed, you need to add --disable-libxml to the configure command in the instructions below. Note that this will prevent the pear command from being built.

Install PHP by running the following commands:

./configure --prefix=/usr                \
            --sysconfdir=/etc            \
            --localstatedir=/var         \
            --datadir=/usr/share/php     \
            --mandir=/usr/share/man      \
            --without-pear               \
            --enable-fpm                 \
            --with-fpm-user=apache       \
            --with-fpm-group=apache      \
            --with-config-file-path=/etc \
            --with-zlib                  \
            --enable-bcmath              \
            --with-bz2                   \
            --enable-calendar            \
            --enable-dba=shared          \
            --with-gdbm                  \
            --with-gmp                   \
            --enable-ftp                 \
            --with-gettext               \
            --enable-mbstring            \
            --with-readline              &&
make

To test the results, issue: make test. A few tests may fail, in which case you are asked whether you want to send the report to the PHP developers. If you want to automate the test, you may prefix the command with yes "n" | .

Now, as the root user:

make install                                     &&
install -v -m644 php.ini-production /etc/php.ini &&

install -v -m755 -d /usr/share/doc/php-7.3.4 &&
install -v -m644    CODING_STANDARDS EXTENSIONS INSTALL NEWS README* UPGRADING* php.gif \
                    /usr/share/doc/php-7.3.4 &&
ln -v -sfn          /usr/lib/php/doc/Archive_Tar/docs/Archive_Tar.txt \
                    /usr/share/doc/php-7.3.4 &&
ln -v -sfn          /usr/lib/php/doc/Structures_Graph/docs \
                    /usr/share/doc/php-7.3.4

The default configuration files for the fastCGI process manager are installed only if they do not already exist on the system. If this is the first installation, they should be renamed, as the root user:

if [ -f /etc/php-fpm.conf.default ]; then
  mv -v /etc/php-fpm.conf{.default,} &&
  mv -v /etc/php-fpm.d/www.conf{.default,}
fi

The pre-built HTML documentation is packaged in two forms: a tarball containing many individual files, useful for quick loading into your browser, and one large individual file, which is useful for using the search utility of your browser. If you downloaded either, or both, of the documentation files, issue the following commands as the root user to install them (note these instructions assume English docs, modify the tarball names below if necessary).

For the “Single HTML” file:

install -v -m644 ../php_manual_en.html.gz \
    /usr/share/doc/php-7.3.4 &&
gunzip -v /usr/share/doc/php-7.3.4/php_manual_en.html.gz

For the “Many HTML files” tarball:

tar -xvf ../php_manual_en.tar.gz \
    -C /usr/share/doc/php-7.3.4 --no-same-owner

The bundled pear is not installed because of a bug which might pollute the filesystem with several hidden files and directories. If pear is needed, execucte the following commands to install:

wget http://pear.php.net/go-pear.phar
php ./go-pear.phar

Command Explanations

--datadir=/usr/share/php: This works around a bug in the build machinery, which installs some data to a wrong location.

--enable-fpm: This parameter allows building the fastCGI Process Manager.

--without-pear: This switch disables installation of bundled pear software.

--with-config-file-path=/etc: This parameter makes PHP look for the php.ini configuration file in /etc.

--with-zlib: This parameter adds support for Zlib compression.

--enable-bcmath: Enables bc style precision math functions.

--with-bz2: Adds support for Bzip2 compression functions.

--enable-calendar: This parameter provides support for calendar conversion.

--enable-dba=shared: This parameter enables support for database (dbm-style) abstraction layer functions.

--enable-ftp: This parameter enables FTP functions.

--with-gettext: Enables functions that use Gettext text translation.

--enable-mbstring: This parameter enables multibyte string support.

--with-readline: This parameter enables command line Readline support.

--disable-libxml: This option allows building PHP without libxml2 installed.

--with-apxs2: Instead of building the fastCGI process manager, it is possible to build an apache module. This has some performance penalty for heavy loaded servers, but may be easier to set up. This switch is incompatible with the --enable-fpm and --with-fpm-... switches.

--with-mysqli=shared: This option includes MySQLi support.

--with-mysql-sock=/run/mysqld/mysqld.sock: Location of the MySQL unix socket pointer.

--with-pdo-mysql=shared: This option includes PDO: MySQL support.

--with-tidy=shared: This option includes tidy library support.

Configuring PHP

Config Files

/etc/php.ini, /etc/pear.conf, /etc/php-fpm.conf, and /etc/php-fpm.d/www.conf

Configuration Information

The file used as the default /etc/php.ini configuration file is recommended by the PHP development team. This file modifies the default behavior of PHP. If no /etc/php.ini is used, all configuration settings fall to the defaults. You should review the comments in this file and ensure the changes are acceptable in your particular environment.

The fastCGI process manager uses the configuration file /etc/php-fpm.conf. The default file shipped with PHP includes all the /etc/php-fpm.d/*.conf in turn. There is a shipped /etc/php-fpm.d/www.conf file, that contains the parameters related to the interaction with the Apache Web server.

You may have noticed the following from the output of the make install command:

You may want to add: /usr/lib/php to your php.ini include_path

If desired, add the entry using the following command as the root user:

sed -i 's@php/includes"@&\ninclude_path = ".:/usr/lib/php"@' \
    /etc/php.ini

To enable fastCGI support in the Apache web server, two LoadModule directives must be added to the httpd.conf file. They are commented out, so just issue the following command as root user:

sed -i -e '/proxy_module/s/^#//'      \
       -e '/proxy_fcgi_module/s/^#//' \
       /etc/httpd/httpd.conf

Those modules accept various ProxyPass directives. One possibility is (as the root user):

echo \
'ProxyPassMatch ^/(.*\.php)$ fcgi://127.0.0.1:9000/srv/www/$1' >> \
/etc/httpd/httpd.conf

Additionally, it may be useful to add an entry for index.php to the DirectoryIndex directive of the httpd.conf file. Lastly, adding a line to setup the .phps extension to show highlighted PHP source may be desirable:

AddType application/x-httpd-php-source .phps

You'll need to restart the Apache web server after making any modifications to the httpd.conf file.

Boot Script

To automatically start the php-fpm daemon when the system is rebooted, install the /etc/rc.d/init.d/php bootscript from the blfs-bootscripts-20190313 package as the root user:

make install-php

Contents

Installed Programs: pear, peardev, pecl, phar (symlink), phar.phar, php, php-cgi, php-config, php-fpm, phpdbg, and phpize
Installed Libraries: dba.{so,a} and opcache.{so,a} in /usr/lib/php/extensions/no-debug-non-zts-20180731
Installed Directories: /etc/php-fpm.d, /usr/{include,lib,share}/php and /usr/share/doc/php-7.3.4

Short Descriptions

php

is a command line interface that enables you to parse and execute PHP code.

pear

is the PHP Extension and Application Repository (PEAR) package manager. This isn't installed by default.

php-fpm

is the fastCGI process manager for PHP.

phpdbg

is the interactive PHP debugger.

Last updated on 2019-04-08 13:19:33 -0500

LFS Linux 安装MariaDB-10.3.14

$
0
0

MariaDB-10.3.14

Introduction to MariaDB

MariaDB is a community-developed fork and a drop-in replacement for the MySQL relational database management system.

This package is known to build and work properly using an LFS-8.4 platform.

Package Information

[Note]

Note

The installed size of MariaDB is 473 MB, but this can be reduced by about 200 MB, if desired, by removing the /usr/share/mysql/test directory after installation.

MariaDB Dependencies

Required

CMake-3.14.2

Recommended

Optional

Boost-1.70.0, libxml2-2.9.9, Linux-PAM-1.3.1, MIT Kerberos V5-1.17, PCRE-8.43, Ruby-2.6.3, unixODBC-2.3.7, Valgrind-3.15.0, Groonga, KyTea, Judy, libaio, lz4, MeCab, MessagePack, mruby, Sphinx, TokuDB, and ZeroMQ

User Notes: http://wiki.linuxfromscratch.org/blfs/wiki/mariadb

Installation of MariaDB

[Warning]

Warning

MariaDB and MySQL cannot be installed on the same system without extensive changes to the build configuration of one of the two applications.

For security reasons, running the server as an unprivileged user and group is strongly encouraged. Issue the following (as root) to create the user and group:

groupadd -g 40 mysql &&
useradd -c "MySQL Server" -d /srv/mysql -g mysql -s /bin/false -u 40 mysql

Install MariaDB by running the following commands:

sed -i "s@data/test@\${INSTALL_MYSQLTESTDIR}@g" sql/CMakeLists.txt &&

mkdir build &&
cd build    &&

cmake -DCMAKE_BUILD_TYPE=Release                      \
      -DCMAKE_INSTALL_PREFIX=/usr                     \
      -DINSTALL_DOCDIR=share/doc/mariadb-10.3.14       \
      -DINSTALL_DOCREADMEDIR=share/doc/mariadb-10.3.14 \
      -DINSTALL_MANDIR=share/man                      \
      -DINSTALL_MYSQLSHAREDIR=share/mysql             \
      -DINSTALL_MYSQLTESTDIR=share/mysql/test         \
      -DINSTALL_PLUGINDIR=lib/mysql/plugin            \
      -DINSTALL_SBINDIR=sbin                          \
      -DINSTALL_SCRIPTDIR=bin                         \
      -DINSTALL_SQLBENCHDIR=share/mysql/bench         \
      -DINSTALL_SUPPORTFILESDIR=share/mysql           \
      -DMYSQL_DATADIR=/srv/mysql                      \
      -DMYSQL_UNIX_ADDR=/run/mysqld/mysqld.sock       \
      -DWITH_EXTRA_CHARSETS=complex                   \
      -DWITH_EMBEDDED_SERVER=ON                       \
      -DSKIP_TESTS=ON                                 \
      -DTOKUDB_OK=0                                   \
      .. &&
make

To test the results, issue: make test.

[Note]

Note

A more extensive set of tests can be run with the following:

pushd mysql-test
./mtr --parallel <N> --mem --force
popd

Where N is the number of tests to run in parallel. A little over 3700 tests are run in about 14 SBU with N=4. Three tests are known to fail due to character set issues.

Now, as the root user:

make install 

Command Explanations

sed -i ... sql/CMakeLists.txt: Set correct installation directory for some components.

-DWITH_EMBEDDED_SERVER=ON: This switch enables compiling the embedded server library needed by certain applications, such as Amarok..

-DWITH_EXTRA_CHARSETS=complex: This switch enables support for the complex character sets.

-DSKIP_TESTS=ON: This switch disables tests for MariaDB Connector/C which are not supported without additional setup.

-DWITHOUT_SERVER=ON: Use this switch if you don't want the server and would like to build the client only.

[Note]

Note

There are numerous options available to cmake. Check the output of the cmake . -LH for additional customization options.

Configuring MySQL

Config Files

/etc/mysql/my.cnf and ~/.my.cnf

Configuration Information

Create basic /etc/mysql/my.cnf using the following command as the root user:

install -v -dm 755 /etc/mysql &&
cat > /etc/mysql/my.cnf << "EOF"
# Begin /etc/mysql/my.cnf

# The following options will be passed to all MySQL clients
[client]
#password       = your_password
port            = 3306
socket          = /run/mysqld/mysqld.sock

# The MySQL server
[mysqld]
port            = 3306
socket          = /run/mysqld/mysqld.sock
datadir         = /srv/mysql
skip-external-locking
key_buffer_size = 16M
max_allowed_packet = 1M
sort_buffer_size = 512K
net_buffer_length = 16K
myisam_sort_buffer_size = 8M

# Don't listen on a TCP/IP port at all.
skip-networking

# required unique id between 1 and 2^32 - 1
server-id       = 1

# Uncomment the following if you are using BDB tables
#bdb_cache_size = 4M
#bdb_max_lock = 10000

# InnoDB tables are now used by default
innodb_data_home_dir = /srv/mysql
innodb_log_group_home_dir = /srv/mysql
# All the innodb_xxx values below are the default ones:
innodb_data_file_path = ibdata1:12M:autoextend
# You can set .._buffer_pool_size up to 50 - 80 %
# of RAM but beware of setting memory usage too high
innodb_buffer_pool_size = 128M
innodb_log_file_size = 48M
innodb_log_buffer_size = 16M
innodb_flush_log_at_trx_commit = 1
innodb_lock_wait_timeout = 50

[mysqldump]
quick
max_allowed_packet = 16M

[mysql]
no-auto-rehash
# Remove the next comment character if you are not familiar with SQL
#safe-updates

[isamchk]
key_buffer = 20M
sort_buffer_size = 20M
read_buffer = 2M
write_buffer = 2M

[myisamchk]
key_buffer_size = 20M
sort_buffer_size = 20M
read_buffer = 2M
write_buffer = 2M

[mysqlhotcopy]
interactive-timeout

# End /etc/mysql/my.cnf
EOF

You can now install a database and change the ownership to the unprivileged user and group (perform as the root user):

mysql_install_db --basedir=/usr --datadir=/srv/mysql --user=mysql &&
chown -R mysql:mysql /srv/mysql

Further configuration requires that the MariaDB server is running. Start the server using the following commands as the root user:

install -v -m755 -o mysql -g mysql -d /run/mysqld &&
mysqld_safe --user=mysql 2>&1 >/dev/null &

A default installation does not set up a password for the administrator, so use the following command as the root user to set one.

mysqladmin -u root password

Configuration of the server is now finished. Shut the server down using the following command as the root user:

mysqladmin -p shutdown

Boot Script

Install the /etc/rc.d/init.d/mysql init script included in the blfs-bootscripts-20190313 package as the root user to start the MariaDB server during system boot-up.

make install-mysql

Contents

Installed Programs: aria_chk, aria_dump_log, aria_ftdump, aria_pack, aria_read_log, innochecksum, mariabackup, mariadb_config, mbstream, msql2mysql, my_print_defaults, myisamchk, myisam_ftdump, myisamchk, myisamlog, myisampack, mysql, mysql_client_test, mysql_client_test_embedded, mysql_config, mysql_convert_table_format, mysql_embedded, mysql_find_rows, mysql_fix_extensions, mysql_install_db, mysql_ldb, mysql_plugin, mysql_secure_installation, mysql_setpermission, mysql_tzinfo_to_sql, mysql_upgrade, mysql_waitpid, mysqlaccess, mysqladmin, mysqlbinlog, mysqlcheck, mysqld, mysqld_multi, mysqld_safe, mysqld_safe_helper, mysqldump, mysqldumpslow, mysqlhotcopy, mysqlimport, mysqlshow, mysqlslap, mysqltest, mysqltest_embedded, mytop, perror, replace, resolve_stack_dump, resolveip, sst_dump, wsrep_sst_common, wsrep_sst_mariabackup, wsrep_sst_mysqldump, wsrep_sst_rsync, wsrep_sst_xtrabackup, and wsrep_sst_xtrabackup-v2
Installed Libraries: libmariadbclient.a, libmariadb.so, libmysqlclient.a, libmysqlclient_r.a (symbolic links to libmariadbclient.a), libmysqld.{so,a}, libmysqlservices.a, and several under /usr/lib/mysql/plugin/
Installed Directories: /etc/mysql, /usr/{include,lib,share}/mysql, and /usr/share/doc/mariadb-10.3.14

Short Descriptions

The Perl DBI modules must be installed for some of the MariaDB support programs to function properly.

Short Descriptions

aria_chk

is used to check, repair, optimize, sort and get information about Aria tables.

aria_dump_log

is a tool to dump content of Aria log pages.

aria_ftdump

displays full-text index information.

aria_pack

is a tool to generate compressed, read-only Aria tables.

aria_read_log

displays Aria log file contents.

innochecksum

prints checksums for InnoDB files.

mariabackup

is an open source backup tool for InnoDB and XtraDB.

mariadb_config

gets compiler flags for using the MariaDB Connector/C.

mbstream

is an utility for sending InnoDB and XTraDB backups over a stream

msql2mysql

is a tool to convert mSQL programs for use with MySQL.

my_print_defaults

displays the options from option groups of option files.

myisam_ftdump

displays information about FULLTEXT indexes in MyISAM tables.

myisamchk

gets information about your database tables or checks, repairs, or optimizes them.

myisamlog

displays MyISAM log file contents.

myisampack

is a tool for compressing MyISAM tables.

mysql

is a simple SQL shell with input line editing capabilities.

mysql_client_test

is used for testing aspects of the MySQL client API that cannot be tested using mysqltest and its test language.

mysql_client_test_embedded

is a tool to test client API for embedded server.

mysql_config

provides you with useful information for compiling your MySQL client and connecting it to MySQL.

mysql_convert_table_format

converts the tables in a database to use a particular storage engine.

mysql_embedded

is a MySQL client statically linked to libmysqld.

mysql_find_rows

reads files containing SQL statements and extracts statements that match a given regular expression or that contain USE db_name or SET statements.

mysql_fix_extensions

converts the extensions for MyISAM (or ISAM ) table files to their canonical forms.

mysql_install_db

initializes the MySQL data directory and creates the system tables that it contains, if they do not exist.

mysql_ldb

is the RocksDB tool.

mysql_plugin

is a utility that enable MySQL administrators to manage which plugins a MySQL server loads.

mysql_secure_installation

is a tool to improve MySQL installation security.

mysql_setpermission

sets permissions in the MySQL grant tables.

mysql_tzinfo_to_sql

loads the time zone tables in the mysql database.

mysql_upgrade

examines all tables in all databases for incompatibilities with the current version of MySQL Server.

mysql_waitpid

signals a process to terminate and waits for the process to exit.

mysqlaccess

checks the access privileges for a host name, user name, and database combination.

mysqladmin

is a client for performing administrative operations.

mysqlbinlog

read binary log files.

mysqlcheck

performs table maintenance: It checks, repairs, optimizes, or analyzes tables.

mysqld

is the MySQL server daemon.

mysqld_multi

is designed to manage several mysqld processes that listen for connections on different Unix socket files and TCP/IP ports.

mysqld_safe

is the recommended way to start a mysqld server on Unix and NetWare.

mysqldump

is a backup program.

mysqldumpslow

parses MySQL slow query log files and prints a summary of their contents.

mysqlhotcopy

locks the table, flush the table and then performs a copy of the database.

mysqlimport

reads a range of data formats, and inserts the data into a database.

mysqlshow

shows the structure of a MariaDB database.

mysqlslap

is a diagnostic program designed to emulate client load for a MySQL server and to report the timing of each stage.

mysqltest

runs a test case against a MySQL server and optionally compares the output with a result file.

mysqltest_embedded

is similar to the mysqltest command but is built with support for the libmysqld embedded server.

mytop

is a console-based tool for monitoring the threads and overall performance of a MySQL server.

perror

is a utility that displays descriptions for system or storage engine error codes.

replace

is a MariaDB/MySQL extension to the SQL standard.

resolve_stack_dump

resolves a numeric stack dump to symbols.

resolveip

is a utility for resolving IP addresses to host names and vice versa.

sst_sump

dumps the content of sst files (the format used by RocksDB).

Last updated on 2019-04-07 13:56:47 -0500

PHP 环境开启 openssl

$
0
0

下载 PHP 源码

需要下载和使用的 php 同版本的 php 源码,下载到 /var/www/php5(根据实际情况调整具体目录)目录下。

  1. cd /var/www/php5
  2. wget http://mirrors.sohu.com/php/php-5.5.7.tar.gz

解压并进入 PHP 的 openssl 扩展模块目录

  1. tar zxvf php-5.5.7.tar.gz
  2. cd php-5.5.7/ext/openssl/

编译 openssl 扩展

  1. /var/www/php5/bin/phpize # 这里为自己的phpize路径,如果找不到,使用whereis phpize查找。
  2. # 执行后,发现错误 无法找到config.m4 ,config0.m4就是config.m4。直接重命名
  3. mv config0.m4 config.m4
  4. /var/www/php5/bin/phpize
  5. ./configure --with-openssl --with-php-config=/var/www/php5/bin/php-config
  6. make
  7. make install

安装完成后,会返回一个.so文件(openssl.so)的目录。在此目录下把 openssl.so 文件拷贝到你在 php.ini 中指定的 extension_dir 下(在 php.ini 文件中查找:extension_dir =),这里的目录是 var/www/php5/lib/php/extensions 。

修改 php.ini 文件并重启 Apache

编辑php.ini文件,在文件最后添加

  1. extension=openssl.so

重启 Apache

  1. /usr/local/apache2/bin/apachectl restart

Linux 误删除文件恢复方法介绍

$
0
0

云服务器 ECS Linux 下,rm -rf  意味着一旦删除的文件是无法挽回的。但如果在没有文件覆盖操作的前提下,可以先尝试相关方式进行文件恢复。


通过 extundelete 尝试数据恢复

说明

  • 下文以 CentOS 6.5 ext4 文件系统为实验环境,工具为 extundelete。
  • 在实际线上恢复过程中,切勿将 extundelete 安装到误删的文件所在磁盘,这样会有一定几率将需要恢复的数据彻底覆盖。建议加装一块磁盘将 extundelete 安装到此磁盘,再做以下操作。因为后续恢复删除文件的操作要执行 umount 设备分区的操作,所以此方法并不适合删除系统盘分区中的文件。


1. 检查系统依赖包。

9.JPG

如果没有以上输出信息请用yum安装。


2. 下载并安装软件。

wget http://nchc.dl.sourceforge.net/project/extundelete/extundelete/0.2.4/extundelete-0.2.4.tar.bz2
tar -jxvf extundelete-0.2.4.tar.bz2
cd extundelete-0.2.4
./configure && make && make install

       检验安装是否成功。

   10.JPG

3.  删除掉 /mnt 下面的压缩文件 navicatformysql.zip

   11.JPG

4.  查看被删除的文件。

  1).  查看前需要卸载该磁盘分区

  12.JPG

 2).  一般一个分区挂载到一个目录下时,这个”根”目录的 inode 值为 2。我们为了查看根目录所有文件,所以查看分区 inode 为  2的这个部分执行:

 extundelete /dev/sdb1 --inode 2

   13.JPG

  标记为 deleted 的就是被删除的文件。

5. 恢复设备上的文件。

14.JPG

默认被删文件会恢复到当前目录下的 RECOVERED_FILES 目录中去。

15.JPG

6. 检验是否恢复成功。

16.JPG

  上传压缩包进行检验。

17.JPG

MD5 值相同,恢复成功。


使用工具 ext3grep 尝试恢复


这里用到的套件是 ext3grep。系统必须默认的安装上 e2fsprogs-libs-1.39-23.el5e、2fsprogs-devel-1.39-23.el5、e2fsprogs-1.39-23.el5 这些软件

[root@localhost ~]# rpm -qa|grep e2fsprogs
e2fsprogs-libs-1.39-23.el5
e2fsprogs-devel-1.39-23.el5
e2fsprogs-1.39-23.el5
 [root@localhost ~]# ll ext3grep-0.10.2.tar.gz 
-rw-r--r-- 1 root root 236364 Oct 17  2011 ext3grep-0.10.2.tar.gz
[root@localhost ~]# tar zxvf ext3grep-0.10.2.tar.gz
[root@localhost ~]# cd ext3grep-0.10.2
[root@localhost ext3grep-0.10.2]# ./configure 
[root@localhost ext3grep-0.10.2]# make && make install
[root@localhost ~]# ll /usr/local/bin
total 2656
-rwxr-xr-x 1 root root 2709704 Oct 15 04:46 ext3grep   //这句是那个可执行文件

操作示例:

[root@localhost ~]# mkdir /data/ /ixdba/
[root@localhost data]# dd if=/dev/zero of=data-disk bs=1M count=105
[root@localhost data]# mkfs.ext3 data-disk   //格式为ext3的文件系统,在出现的提示符处输入y
[root@localhost data]# mount -o loop /data/data-disk /ixdba/  //挂载
[root@localhost data]# cp /etc/host* /ixdba/  //往里边放文件
[root@localhost data]# cp /etc/passwd /ixdba/ 
[root@localhost data]# cd /ixdba/ 
[root@localhost data]# rm -rf *   //制造删除的动作
[root@localhost data]# cd /data/
[root@localhost data]# ext3grep /data/data-disk --ls --inode 2   //查看丢失的文件
[root@localhost data]# ext3grep /data/data-disk --restore-file passwd  //仅仅恢复passwd这个文件
[root@localhost data]# ext3grep /data/data-disk --restore-all    //恢复的动作,全部恢复
[root@localhost data]# ls
data-disk  data-disk.ext3grep.stage1  data-disk.ext3grep.stage2  RESTORED_FILES
[root@localhost data]# ll RESTORED_FILES/       //所有恢复的文件全在这个文件夹里存放,都找回来了
total 48
-rw-r--r-- 1 root root   17 Oct 15 06:03 host.conf
-rw-r--r-- 1 root root  187 Oct 15 06:03 hosts
-rw-r--r-- 1 root root  161 Oct 15 06:03 hosts.allow
-rw-r--r-- 1 root root  347 Oct 15 06:03 hosts.deny
drwx------ 2 root root 4096 Oct 15 06:04 lost+found
-rw-r--r-- 1 root root 1635 Oct 15 06:03 passwd
Viewing all 780 articles
Browse latest View live